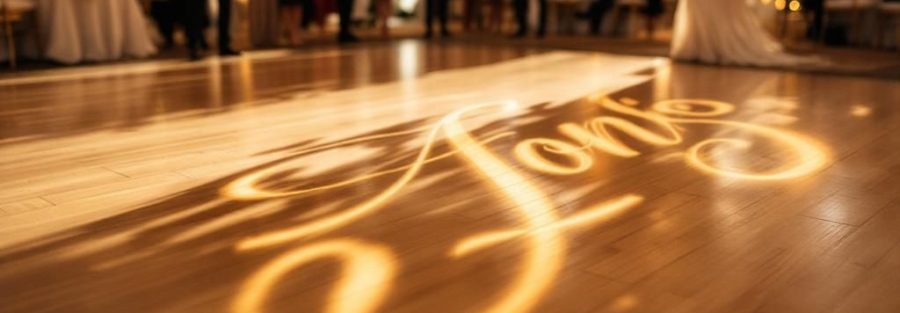
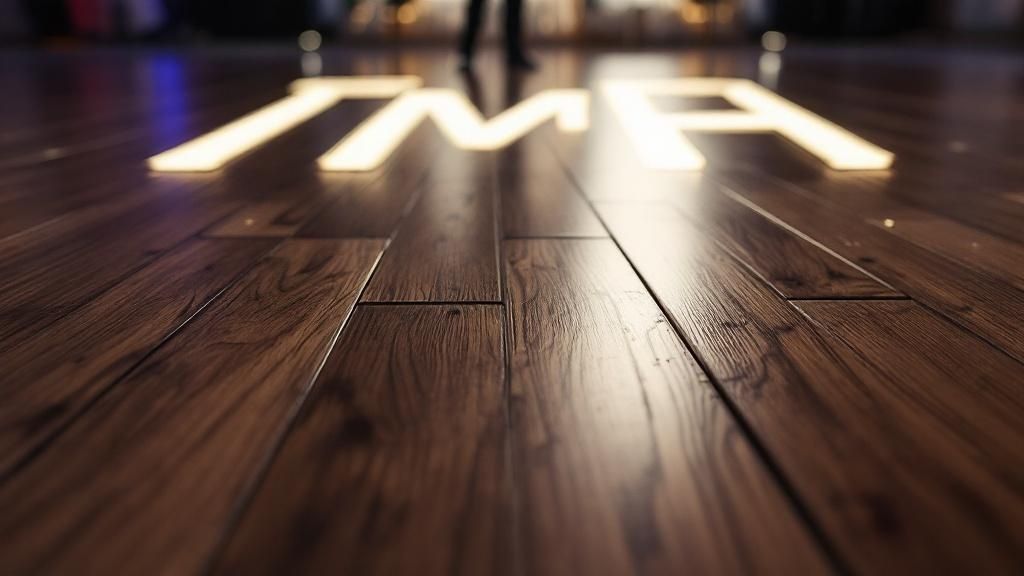
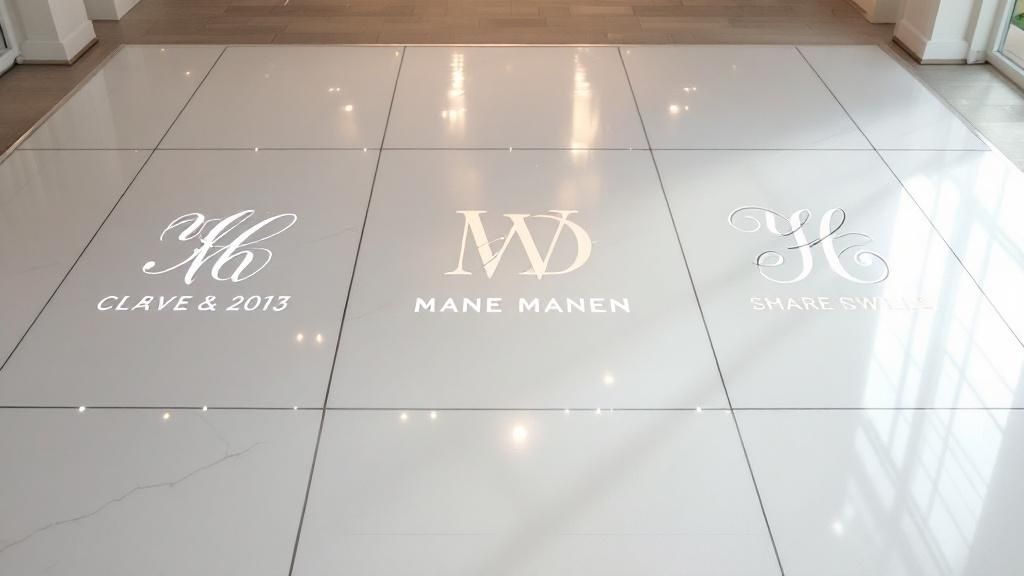
You've probably seen them at a high-end wedding or a swanky corporate event—those crisp, glowing initials or logos projected right onto the middle of the dance floor. That's a monogram light, and it’s one of the easiest ways to add a serious 'wow' factor to your space.
It’s all done with a special device called a gobo projector. Think of it like a slide projector, but way cooler. It shines a custom-designed image—your names, a wedding date, a company logo—turning a plain floor into a stunning, personalized centerpiece. It's a simple trick with a huge impact, delivering that custom feel without breaking the bank.
How a Monogram Light Totally Transforms Your Dance Floor
Let's get real for a second. You want your event to feel special, not like every other cookie-cutter party. A monogram light is one of the most effective ways to do just that. It's not just about adding some light; it's about creating an emotional focal point that becomes the heart of your celebration.
Picture a newly married couple having their first dance, their initials glowing softly right under their feet. Or imagine a corporate party where the company logo is projected with elegance in the middle of the room, reinforcing brand pride. These are the details that stick with people, the moments that turn a good event into a great one. That simple projection becomes the backdrop for some of the night's best memories and photos.
It's All About Creating a Personal Vibe
The real magic of a monogram light is how instantly personal it makes a space feel. It sends a clear message to your guests: every single detail was planned with care. This kind of custom touch does a few things really well:
- It Sets the Tone: The design you choose says a lot. A flowing, classic script sets a romantic wedding vibe, while a bold, modern font is perfect for a company launch party.
- It Fills Empty Space: Big, empty dance floors or plain walls can feel a little cold and uninviting. A monogram projection warms up the area and adds a dynamic visual element.
- It's a Photo Magnet: Your beautifully lit monogram becomes a natural spot for photos. Guests love it, and your event gets a second life on social media feeds and in professional albums.
The entire LED dance floor industry, which includes custom options like monograms, hit a global value of about $1.2 billion in 2023. That number alone shows just how popular these custom lighting solutions have become.
A monogram projection does more than just decorate—it tells your story. It’s your signature, lit up for everyone to see, making the space feel completely yours for the night.
A High-Impact, Low-Fuss Decor Choice
When you stack it up against other decor options like custom vinyl floor wraps or massive floral installations, monogram lighting gives you a ton of visual bang for your buck. It’s a smart way to elevate the entire room's ambiance without a massive investment.
Just as a great caterer can make an event memorable, focusing on aesthetic details like lighting are among the key elements for creating unforgettable experiences. For even more ideas on making your dance floor truly spectacular, don't miss our complete guide on wedding dance floor lighting.
https://1021events.com/wedding-dance-floor-lighting/
Choosing Your Gobo Projector and Materials
Okay, let's get into the gear. Picking the right tech for your monogram light might seem a little daunting, but it really just comes down to two things: the projector and the gobo material itself. Nail these two choices, and you're on your way to a seriously impressive, crisp projection that brings your vision to life on the dance floor.
The projector is the heart of the whole setup. For most weddings, a simple, static model is perfect. It does one job and does it well: projecting your beautiful monogram in a fixed spot all night. If you want a little more flair, some projectors can add a slow, elegant rotation or even cycle through different colors.
Then there's the gobo—that little disc where your design is actually created. You've basically got two options here, and the best one for you really depends on how complex your design is.
Steel Gobos: The Durable Workhorse
Think of a steel gobo as a high-tech metal stencil. Your design is precision-cut by a laser out of a thin piece of stainless steel. This makes them super durable and budget-friendly, which is why they're the standard for most text-based monograms, simple initials, and clean logos.
There's just one tiny catch. Since it's a stencil, any letter with a "hole" in it—like an 'O', 'B', or 'A'—needs small connector tabs to hold the center part in place. Honestly, from a distance on the dance floor, you’ll barely notice it, but it's something to keep in mind if your design is super intricate.
Glass Gobos: For Flawless Detail
When your design is all about the fine details, involves color, or needs to look picture-perfect, a glass gobo is the way to go. Instead of being cut, your artwork is laser-etched right onto a specialized piece of glass.
This technique creates a perfect, high-resolution copy of your design without any need for those little connector tabs. It's the only option for full-color projections and is a must for complex logos or crests. Yes, they cost a bit more, but for that absolutely flawless finish, the investment pays off. If you want to dive deeper, we've got a whole guide on wedding gobo lighting that covers all the details.
Pro Tip: Have a really detailed black-and-white design, like a family crest with tiny lines? A black-and-white glass gobo is your secret weapon. You get the incredible detail of glass without jumping all the way up to the cost of a full-color one.
To make things even clearer, here’s a quick breakdown of your main options.
Comparing Gobo Projector and Material Options
Use this breakdown of gobo projector features and material types to select the right equipment for your event's specific needs and budget.
| Feature | Steel Gobo | Glass Gobo (Black & White) | Glass Gobo (Full Color) |
|---|---|---|---|
| Best For | Text, initials, simple logos | Intricate B&W designs, crests | Photos, full-color logos |
| Detail Level | Good | Excellent | Flawless (Photo-quality) |
| Design Limits | Requires "tabs" for enclosed shapes | No design limitations | No design limitations |
| Durability | Very high | High (handle with care) | High (handle with care) |
| Cost | $ (Most affordable) | $$ (Mid-range) | $$$ (Premium) |
Choosing between steel and glass really comes down to balancing your design's complexity with your budget.
The infographic below gives you a bird's-eye view of how different lighting types stack up in terms of cost, brightness, and power usage.
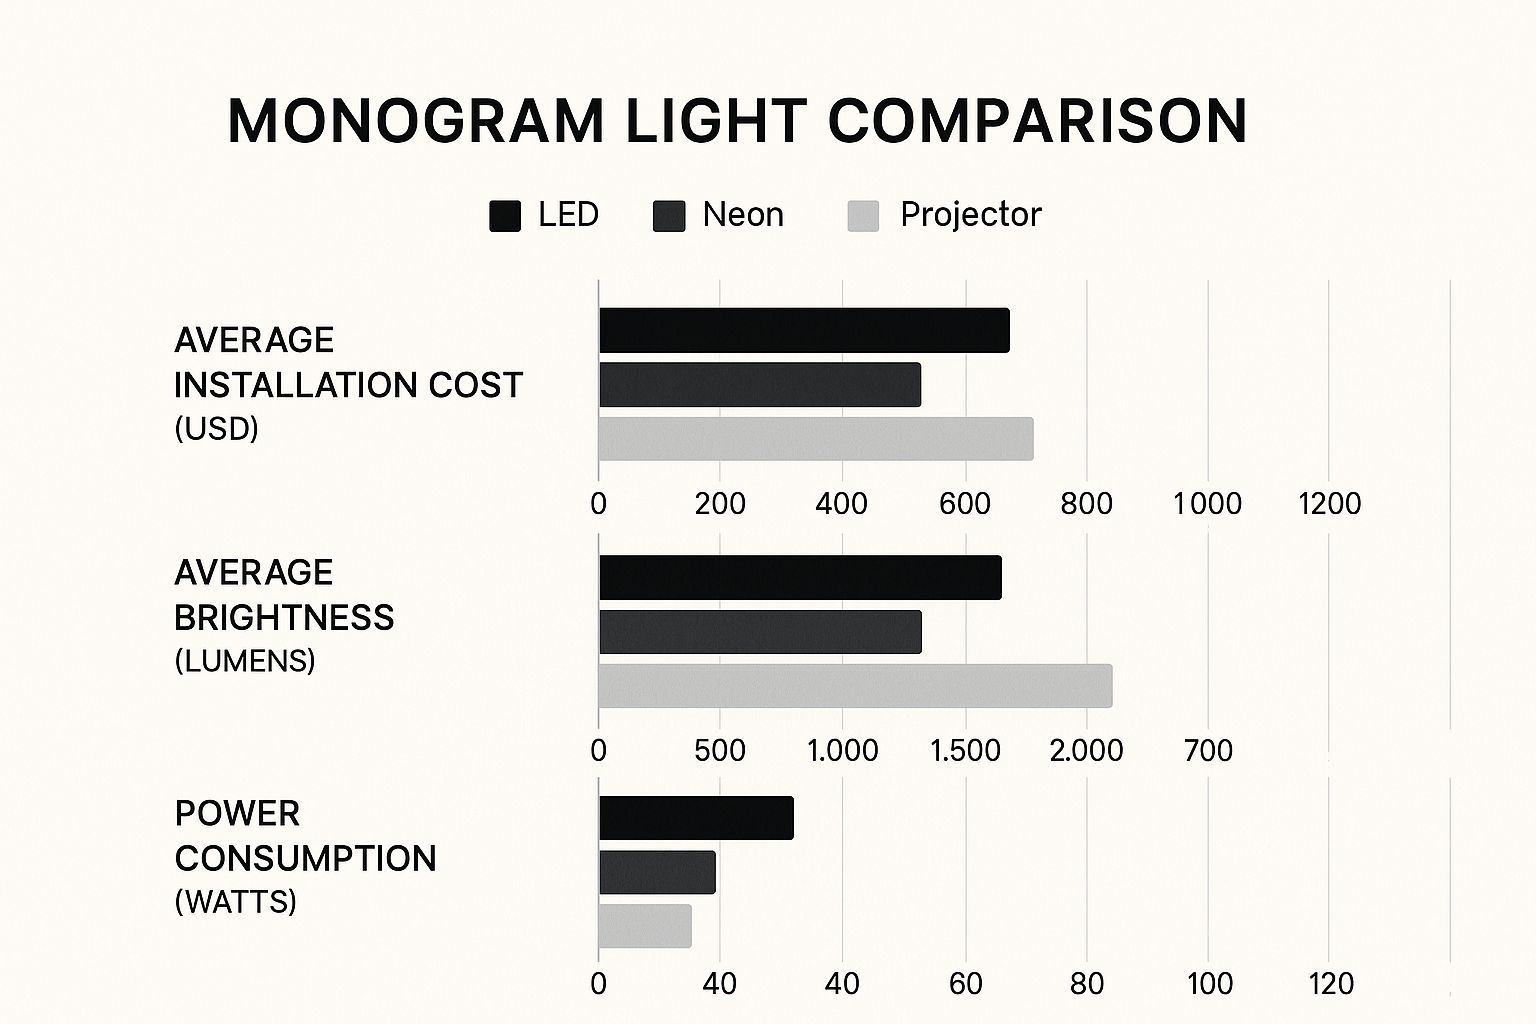
As you can see, gobo projectors really hit that sweet spot of high brightness for a moderate cost, which is why they're such a popular choice for events.
In the end, your venue and your budget will be your best guides. A huge, bright ballroom with tons of ambient light will demand a more powerful projector to make your monogram pop. A darker, cozier space, on the other hand, gives you more flexibility to play with.
Designing a Monogram That Looks Amazing
This is where the magic really starts to happen. Your monogram design is so much more than just a light on the floor—it's a signature piece that really sets the mood for your entire event. Let's get into the creative side of things with some practical tips that I've seen work time and time again, making sure your design ends up crisp, clear, and absolutely stunning.
The first rule of thumb is always readability. A design that looks gorgeous on your computer screen can easily turn into a blurry mess when it's projected across a huge room. The trick is to keep it simple and bold. Think thick lines, clean fonts, and plenty of space between your letters and any other design elements.
For example, those super delicate script fonts with thin, wispy lines? They tend to get completely lost, especially if there's any ambient light in the room. A much better approach is to pair fonts that have a nice contrast—maybe a bold serif for the initials and a cleaner sans-serif for the date. It just pops better.
What to Include in Your Design
When you’re sketching out ideas, try to think beyond just initials. Adding a date or a simple graphic that ties into your overall theme can make the whole design feel much more complete. Just don’t forget that simplicity is your best friend here.
Here are a few popular elements I see couples use all the time:
- Initials & Ampersand: The classic "A & B" is timeless for a reason. It's elegant, clean, and everyone gets it immediately.
- Full Names: Using full first names like "Jessica and Michael" can add a slightly more formal, sophisticated touch.
- The Date: Putting the event date below the names is a fantastic way to commemorate the occasion right there on the dance floor.
- Simple Graphics: A subtle floral wreath, a clean geometric border, or a custom family-style crest can frame the text beautifully without being distracting.
If you're wondering just how popular this is, consider this: interactive LED dance floors, which often feature custom monograms, are a huge trend for high-end events. Venue operators in major cities have reported that adding features like this can boost their rental prices by 15–25%. It's all driven by couples wanting those unique, shareable moments for social media. To really understand the design's impact, it helps to know how to create a captivating logo that tells a story.
Getting the Technical Stuff Right for Your Vendor
Okay, so your design is perfect. Now what? Getting it to your gobo vendor in the right format is absolutely critical for a flawless projection. Handing them a low-resolution file is a recipe for a blurry or pixelated monogram, and that's the last thing anyone wants to see.
Your design file is the blueprint for the final product. Sending a high-quality, clean vector file is the single most important step to ensure your monogram looks sharp and professional.
Here's a quick checklist of what your vendor is going to need from you:
- File Format: Always, always send your design as a vector file. The most common and preferred formats are
.AI(Adobe Illustrator),.EPS, or a high-quality.PDF. These files can be scaled to any size without losing a single bit of quality. - Color: Your design needs to be in pure black and white. No grays, no colors. The black areas are what the light will shine through to create your image, and the white areas will block it.
- Resolution: If for some reason you must use a pixel-based format like a
.JPGor.PNG, make sure it’s huge. It needs to be at least 300 DPI (dots per inch) and as large a file as you can possibly save.
Stick to these simple guidelines, and you’ll save yourself (and your vendor) a lot of headaches. The result will be a monogram light that looks absolutely flawless. For some great real-world examples, check out our guide on using a monogram for weddings.
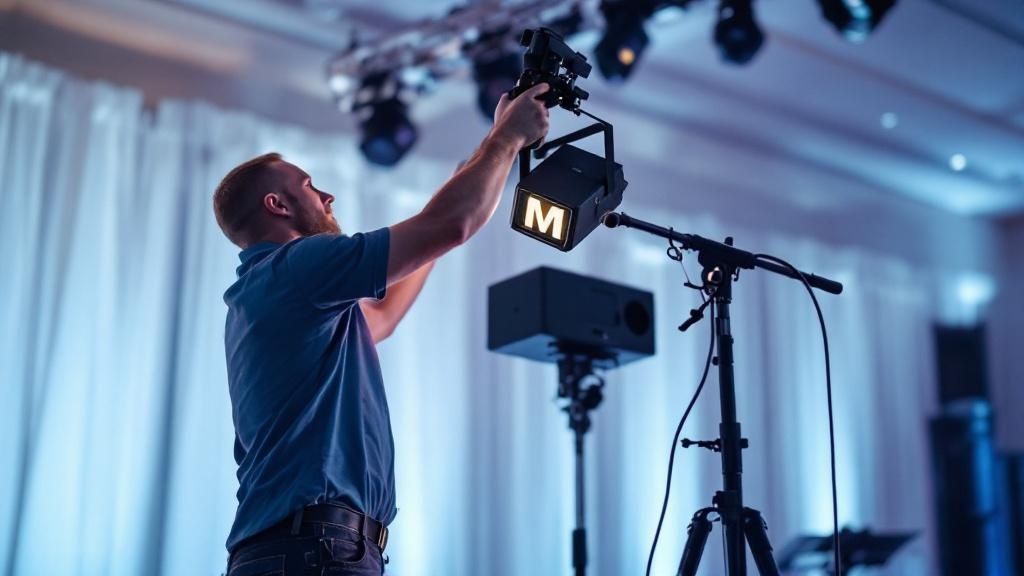
Getting Your Monogram Light Set Up Like a Pro
Alright, you've got your custom gobo design and the projector is in hand. Now for the fun part—making it all come to life. A perfect setup is what transforms a cool monogram light into that stunning, unforgettable focal point of the room. Let's walk through how to get that image looking crisp and perfectly placed on the dance floor, without the usual headaches.
The first thing you have to figure out is placement. Seriously, where you put the projector determines everything else. The sweet spot is always somewhere high, stable, and completely out of the way. Think about mounting it on a lighting truss if one is available, setting it on a high balcony or ledge, or using a dedicated, sturdy stand tucked into a corner where no one will bump into it.
Getting it up high is your best move. Projecting from above not only keeps the gear safe from curious guests but, more importantly, it drastically cuts down on people casting shadows when they walk by. Nothing kills the mood during a first dance like a random guest's shadow slicing right through the couple's initials.
Nailing the Placement and Angle
Once you've scouted a few potential spots, you need to consider the "throw distance." That’s just the fancy term for the distance between the projector's lens and the dance floor. This number is critical because it directly controls how big your projected monogram will be. The farther away the projector, the larger the image. Simple as that.
Most rental companies can give you a pretty good idea of the ideal throw distance for their gear to get a specific image size. A quick check with a laser distance measurer can save you a ton of guesswork. If you need a deeper dive into the gear itself, our guide on picking a wedding monogram projector is a great resource for matching the equipment to your venue.
Now, let's talk angles. It's almost never possible to get a perfectly straight-on shot directly down onto the floor. You'll almost always be projecting from an angle, which can stretch the image out and make it look like a trapezoid.
This is where a little feature called keystone correction becomes your best friend. Most professional projectors have this built-in. It lets you digitally tweak the corners of the image, squaring it up so it looks perfectly proportional, even if you're projecting from a weird angle off to the side.
Getting That Razor-Sharp Focus
With the projector in place, the last step is to dial in the focus. It’s exactly like focusing a camera lens. It’s best to do this with two people: one person at the projector making tiny turns of the focus ring, and another down on the dance floor giving a thumbs-up. Keep adjusting until every letter and line is perfectly crisp.
And don't forget about the lighting in the room! Bright overhead lights or sunshine pouring through windows can completely wash out your projection, making it look weak and faded.
Here are a few tricks I've learned over the years to deal with this:
- Coordinate with the Venue: Before the event, chat with the manager and ask if they can dim the house lights over the dance floor area once the main festivities begin.
- Opt for More Power: If you know the venue is naturally bright, make sure you get a projector with a higher lumen count. More brightness is the best way to cut through competing light.
- Time the Big Reveal: For the biggest "wow" factor, hold off on turning the monogram on until the evening rolls in, the sun is down, and the ambient lighting is much more controllable.
A little bit of planning and these simple tweaks are all it takes. It’s the difference between a setup that just works and one that looks truly professional and leaves a lasting impression.
Sidestepping the Common Monogram Lighting Pitfalls
I've seen it happen more times than I can count. A fantastic idea for a monogram light on the dance floor just… falls flat. A few common mistakes can take a beautiful concept and turn it into a blurry, hard-to-read mess. The good news is, once you know what to look out for, these slip-ups are easy to avoid.
One of the biggest culprits is a design-gobo mismatch. Trying to force an incredibly detailed design with lots of fine lines and tiny text onto a standard steel gobo just doesn't work. The little metal tabs needed to hold the stencil together will slice right through your image, making it almost illegible.
Pro Tip: Your design's complexity dictates the gobo material. If you have your heart set on an intricate monogram, a glass gobo isn't an upgrade—it's a necessity for getting that crisp, perfect projection.
Don't Get Blindsided by the Venue
Another classic mistake is not thinking about the room itself. A projector that looks amazing in a small, dark room will get completely washed out in a grand ballroom with soaring ceilings and tons of ambient light from windows or house lights. You absolutely have to ask about the projector's lumen count. This tells you how bright it is and if it has enough punch to compete with the room's lighting.
On that note, don't forget the on-the-ground logistics. I've seen these little oversights cause major headaches on event day:
- Bad Projector Placement: You can’t just stick the projector anywhere. If it’s in a high-traffic area, someone will bump into it, knocking your perfectly aimed monogram askew or, worse, toppling the whole setup.
- No Power Plan: Never assume an outlet will be right where you need it. Check with the venue coordinator weeks ahead of time to map out your power source.
- No Rigging or Mounting Strategy: Showing up and realizing there's nowhere to safely mount the projector is a nightmare. Figure out your mounting points or where a stand can securely live before the event.
This kind of planning is even more important now that custom lighting is so popular. The market for portable dance floors hit $306.8 million in 2023, and rental companies are seeing about 45% of their orders include requests for custom lighting. You can't just think about the floor; you have to plan the lighting in tandem with it. You can read more about the trends in customized portable dance floors at datahorizzonresearch.com.
Thinking through these potential issues ahead of time is the secret to a smooth, stress-free setup. When you're ready to start looking at gear, our guide to event lighting rental services can walk you through finding the right equipment for your vision.
Answering Your Monogram Light Questions
Got a few questions before you commit? I get it. Most people do. Let's tackle some of the most common things clients ask me about using a monogram light for their dance floor.
How Much Does a Monogram Light Rental Cost?
This is usually the first question on everyone's mind. You can typically budget between $150 and $400 for a monogram light rental. The final price really depends on where you are and the gear involved.
That price usually gets you the projector, a stand to put it on, and a custom steel gobo. If you're looking for extra flair like adding color, making it spin, or if your design is super detailed and needs a glass gobo, you’ll likely be on the higher end of that range.
Will It Look Good on My Dance Floor?
This is a big one. Will the monogram actually show up well? Almost always, yes, but some surfaces are way better than others.
For the best results, you want a light-colored, non-glossy floor. Think white, beige, or a light wood. These surfaces are perfect because they reflect the light beautifully without creating a nasty glare.
Darker floors, on the other hand, can be tricky. They tend to soak up the light, which can make your monogram look a bit dim. Super shiny or reflective floors can cause a glare that makes the design hard to read. If you're stuck with a less-than-ideal floor, a more powerful projector can definitely help, but it's always best to chat with your lighting pro about the venue's floor ahead of time. They'll have tricks up their sleeve to make it work.
The surface you project onto matters just as much as the projector itself. A light-colored, matte floor is your best bet for a crisp, vibrant monogram that truly pops.
Steel vs. Glass Gobos: What’s the Real Difference?
Okay, let's get into the nitty-gritty. What exactly is the deal with steel versus glass gobos?
Think of a steel gobo like a tiny, super-precise metal stencil. Your design is literally cut right out of the metal. They're tough, budget-friendly, and perfect for most text-based designs or simple logos. The only catch? Any design with a "hole" in it (like the letter 'O' or 'A') needs little connecting tabs to hold the middle part in place.
A glass gobo is a whole different ballgame. The design is laser-etched onto the glass, which means you can get incredible detail—we're talking photo-quality images. There are no connector tabs needed, so the design is seamless. This is your go-to for full-color designs, complex logos, or fancy family crests. As you might guess, they do cost a bit more.
Ready to create a stunning focal point for your event? The team at 1021 Events specializes in custom monogram projections that transform any dance floor into a personalized masterpiece. Let us bring your vision to life. https://www.1021events.com