

Let's be real: a killer photo booth lighting setup is what separates okay photos from jaw-dropping ones. It’s the magic ingredient that makes guests look incredible, not like they’ve been caught in a car's headlights. If you want to create professional, super-shareable images that make your business the talk of the town, getting the lighting right is everything.
Why Nailing Your Photo Booth Lighting Is Non-Negotiable
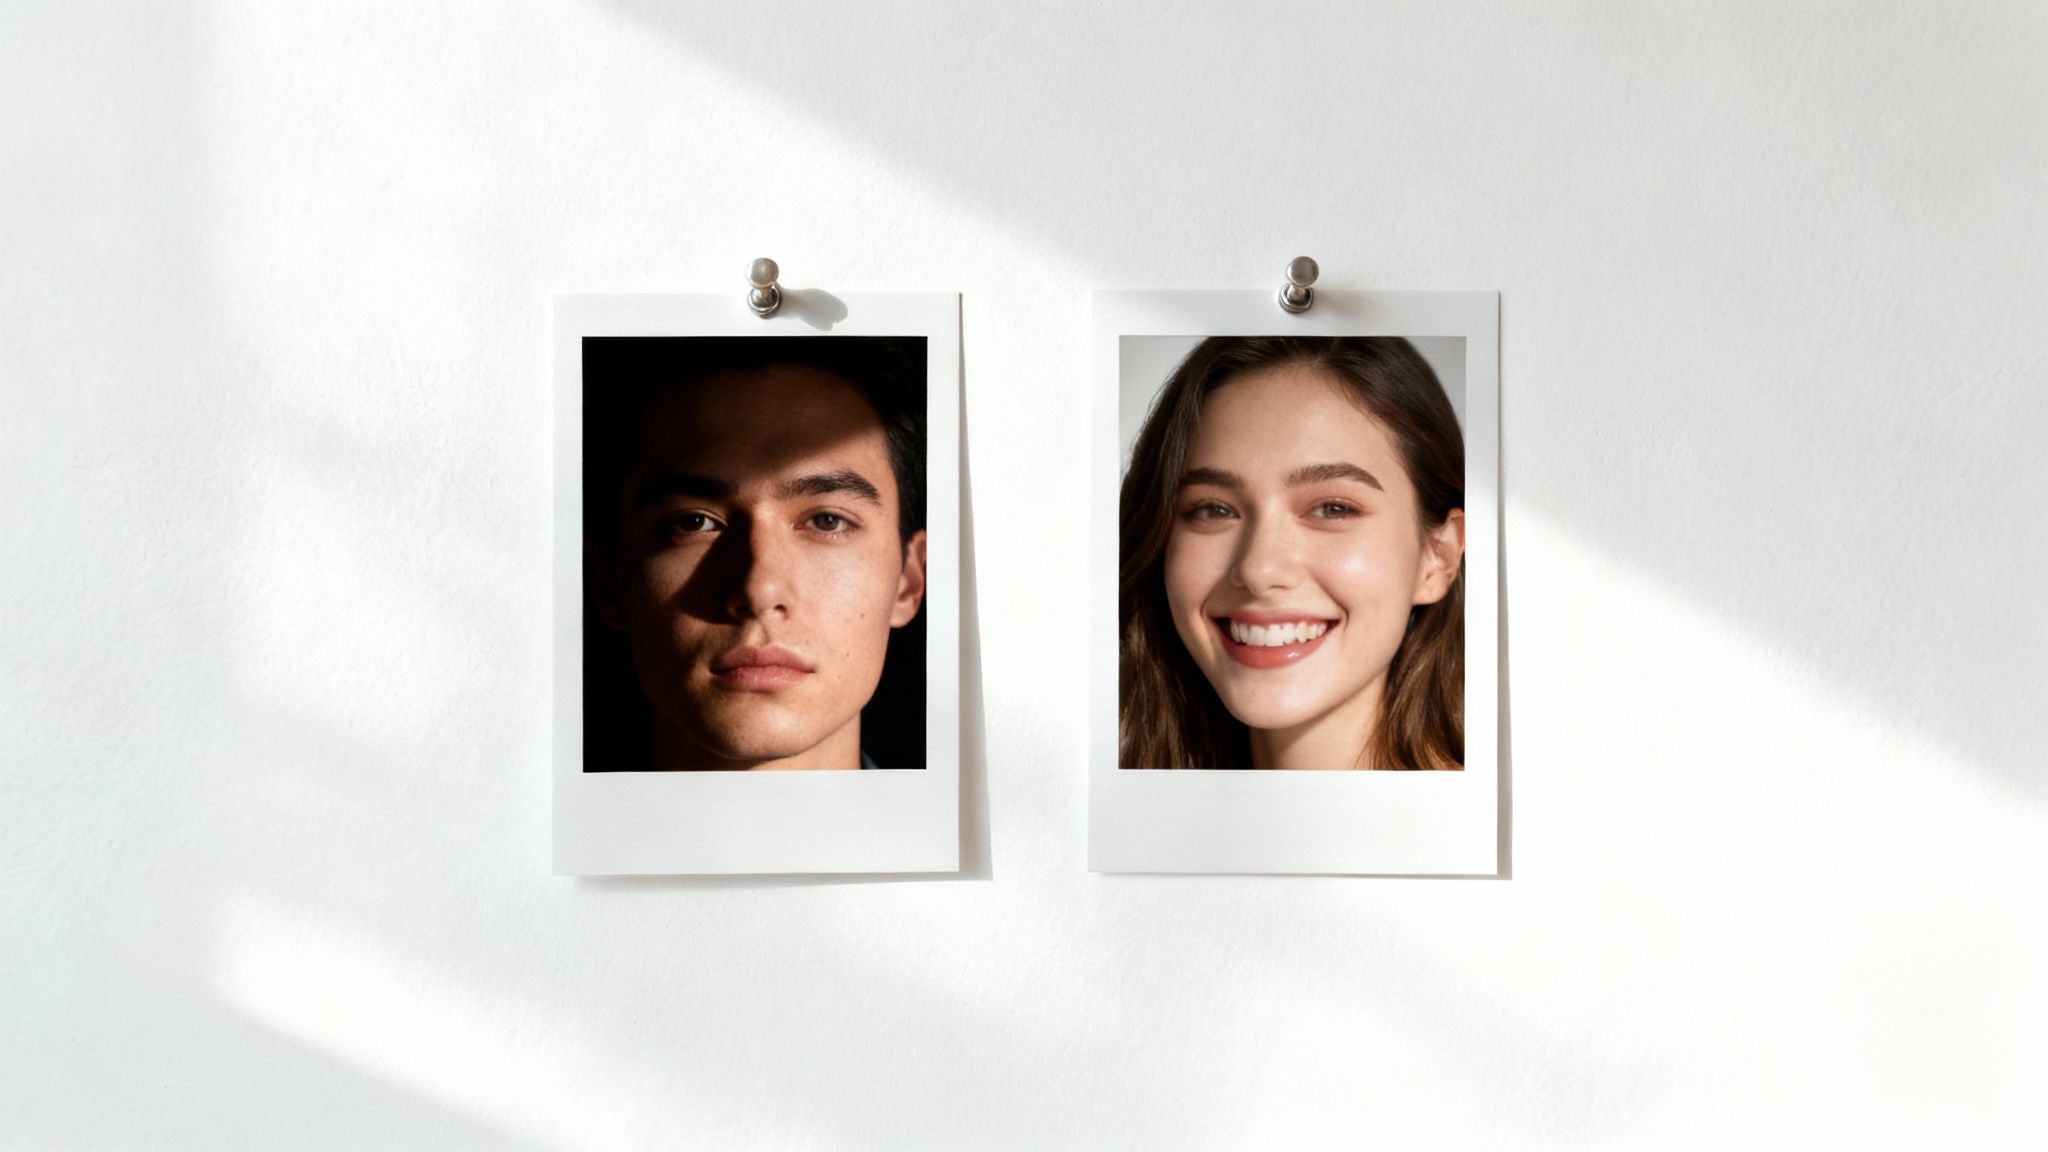
Think about it—no one is going to share a photo where they look terrible. Bad lighting, especially that harsh, direct overhead kind, is the worst offender. It creates those deep, dark shadows under the eyes and nose that we all dread. People call them "raccoon eyes" for a reason, and it’s a look nobody is going for. Your lighting is the single most important tool you have to make sure every single guest loves how they look.
But great light does more than just flatter. It completely changes the vibe of the photo booth. When the first group steps out and sees a stunning photo on the screen, their excitement is contagious. Suddenly, everyone wants a turn. They grab more props, they get sillier, and they have a genuinely better time. The result? A whole gallery of amazing, energy-filled images that perfectly capture the fun of the event.
The Foundation of a Professional Service
A polished, well-executed lighting setup instantly screams "professional." It tells your clients you’re not just an amateur with a camera; you understand the craft of photography and are dedicated to delivering a top-notch product. That kind of attention to detail builds massive trust and makes your pricing feel like a great value. In a crowded market, your consistently beautiful photos become your best advertisement.
The numbers don't lie. The global photo booth market was valued at around $377.3 million in 2021 and is on track to hit a whopping $1.4 billion by 2033. That explosive growth is fueled by clients who want and expect high-quality photos they can immediately share online. And that quality begins and ends with fantastic light.
The heart of a truly great photo booth isn't the fancy camera or the cool backdrop—it's the light. Soft, flattering light is your secret weapon. It’s forgiving, it creates a welcoming atmosphere, and it guarantees every photo is a winner.
Core Lighting Concepts to Understand
To get that professional sheen, you just need to get a handle on a couple of basic concepts. The biggest one is understanding the difference between soft light and hard light.
- Soft Light: This is what you're aiming for. It's the gold standard for portrait photography because it wraps gently around people, minimizing weird shadows and making skin look smooth. You get this beautiful effect from large light sources or by using modifiers like umbrellas and softboxes.
- Hard Light: This comes from a small, direct light source, like a bare flash on a camera. It creates sharp, defined shadows. While it can be cool for dramatic, artsy shots, it’s usually incredibly unflattering for a photo booth where the goal is to make everyone look their best.
To really dig into how light can make or break an image, mastering lighting techniques in photography is a game-changer. The same principles that apply in a high-end photo studio are just as relevant in a photo booth. For more on-the-ground advice, be sure to check out our https://1021events.com/tips-for-event-photography/.
Choosing Your Ideal Photo Booth Lighting Gear
Diving into photo booth lighting can feel a bit overwhelming at first. You're hit with terms like strobes, LEDs, softboxes, and umbrellas, and every piece of gear promises to be the one that makes your photos pop. But here’s the secret: you don't need the most expensive equipment to get incredible results. You just need the right equipment for the job.
The biggest fork in the road right at the start is picking your primary light source. This one decision really shapes the look of your photos and how you'll operate during a busy event.
Strobes vs. Continuous Lights: The Big Debate
A strobe, which you might know as a flash, lets out a super-powerful, super-fast burst of light. This is incredible for freezing motion, so you’ll get tack-sharp photos even when guests are dancing, jumping, or just being silly. Strobes are also beefy enough to completely knock out any weird, colorful ambient light from a DJ or the venue, giving you total control over the scene.
On the other side, you have continuous lights, like LED panels and ring lights, which stay on the whole time. The huge advantage here is that what you see is what you get. There's no guesswork or need for test shots to see how the light falls on your subjects. They're also your only choice if your photo booth will be shooting video clips or making animated GIFs.
My Two Cents: If you're just starting out, I'd strongly suggest a high-quality, large LED light. It’s incredibly user-friendly for still photos and a must-have for any video features, striking a perfect balance between performance and simplicity.
Your choice often boils down to the gig itself. A powerful strobe is a fantastic workhorse for a big corporate event where you need perfectly consistent, high-impact shots all night. But for a wedding, where you might be capturing sweet video messages, a versatile LED setup is probably the smarter play. A good move is to check out event lighting rentals to test drive a few options before you commit to buying.
Don't Forget Your Modifiers!
Pointing a bare light bulb at someone is a recipe for harsh, ugly shadows. That's where light modifiers come in—they're the magic wands that turn a harsh glare into a beautiful, soft glow that makes everyone look amazing.
- Softboxes: These are fabric boxes that fit over your light and have a white diffusion panel on the front. They give you a soft, directional light that’s incredibly flattering for portraits. They come in all shapes and sizes, but just remember: bigger equals softer.
- Umbrellas: These are the ultimate in portability and ease. A "shoot-through" umbrella softens the light as it passes through, while a "reflective" umbrella bounces it back for a broader, less-focused beam. Super quick to set up and tear down.
Comparing Popular Photo Booth Light Sources
Okay, let's break down the common options to help you figure out what's best for your setup. Each one has its place, and knowing the pros and cons will save you a lot of headaches (and money).
| Light Type | Best For | Pros | Cons |
|---|---|---|---|
| Strobe/Flash | Freezing motion and high-volume events | Incredibly sharp photos, overpowers ambient light | Higher learning curve, not for video |
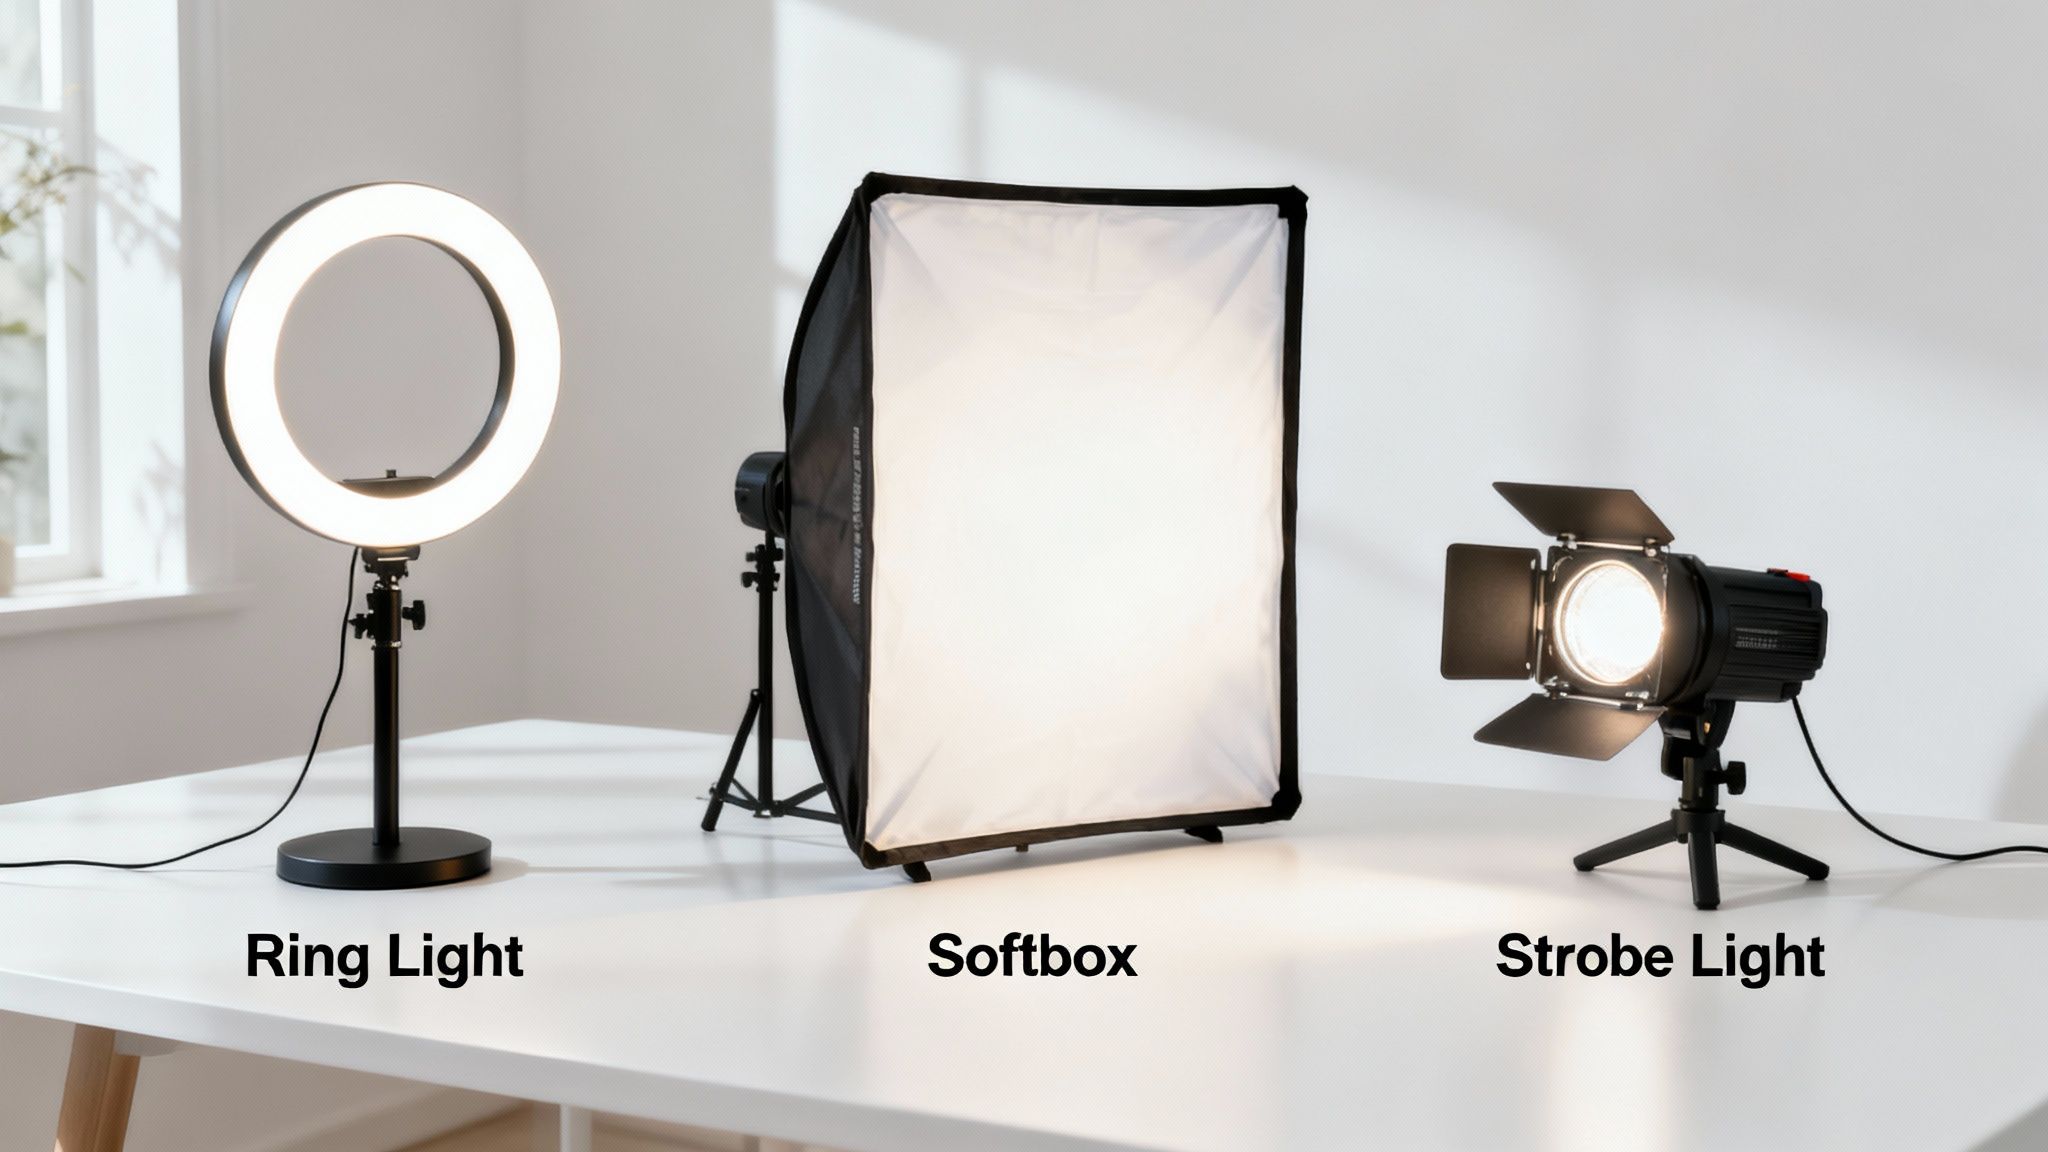
| Ring Light | Simplicity and that signature "catchlight" in the eyes | Very flattering, easy to use, great for single-person shots | Can be less powerful, light is less directional |
| LED Panel | All-around versatility, especially with video | WYSIWYG, great for video/GIFs, adjustable color | Can be less powerful than a strobe, quality varies wildly |
At the end of the day, picking the right light source is about matching the tool to the task.
Honestly, your ideal gear comes down to your budget, the kinds of gigs you're booking, and the specific "look" you want to be known for. My advice? Start simple. Get one good light and one solid modifier, like an 18-inch ring light or a strobe with a medium-sized softbox. Learn it inside and out. You'll be blown away by the pro-level quality you can get from a simple, one-light setup.
Go-To Lighting Setups That Deliver Every Time
Alright, you've got the gear. Now for the fun part: actually putting it all together to create a photo booth lighting setup that wows your clients. Forget the overly technical diagrams and confusing jargon. I'm going to walk you through the battle-tested, go-to arrangements I've used for years to get beautiful, professional results, event after event.
This infographic I put together shows three of my most reliable setups.
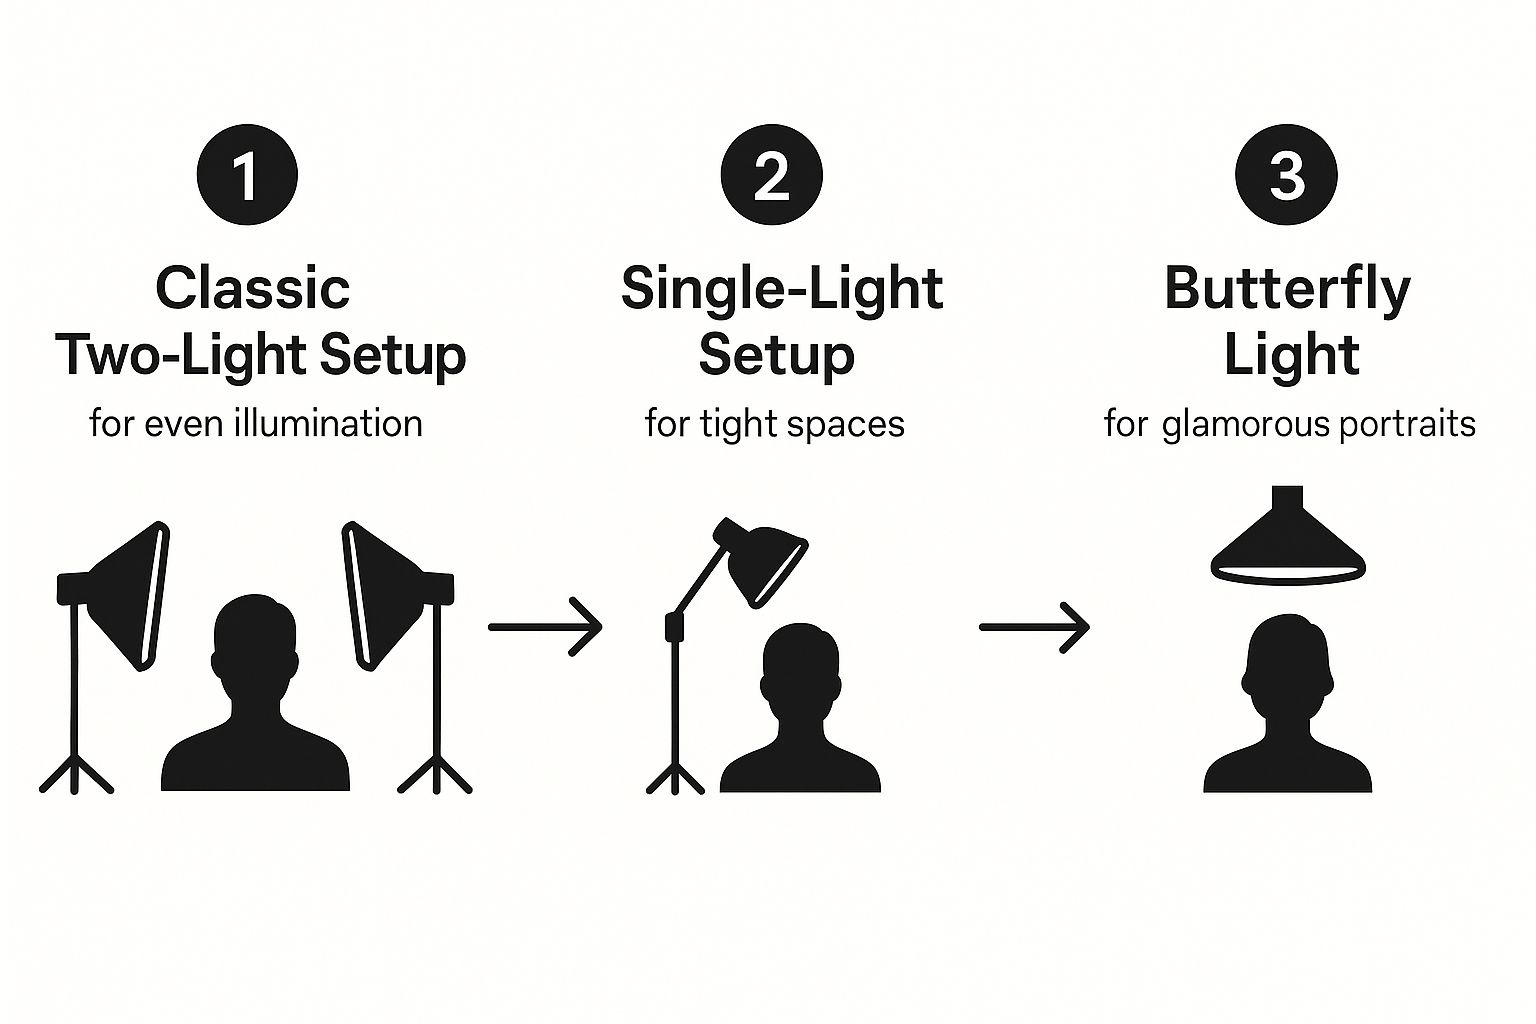
Think of this as your quick-reference guide. It'll show you how to adapt on the fly for even coverage, tight spaces, or a high-fashion look.
The Classic Two-Light Setup
When you need foolproof, even illumination that flatters literally everyone, the two-light setup is your absolute best friend. Seriously, this is the workhorse of the photo booth world for a reason. It knocks out pesky shadows and creates that clean, bright, professional look perfect for any event.
Here’s how to pull it off:
- Main Light: Start by placing your primary light (your key light) at a 45-degree angle to one side of the camera. I like to position it just slightly above the guests' eye level.
- Fill Light: Now, take your second light (the fill light) and place it on the opposite side, also at a 45-degree angle. The trick here is to set this light to a lower power—about half the intensity of your main light—to gently soften any shadows without making the shot look flat and boring.
This approach gives the photos a nice sense of dimension and ensures that even large groups are lit evenly from one side to the other.
The Simple Single-Light Approach
Let's be real, sometimes you get stuck in a tight corner of a venue with practically no room to maneuver. This is where a single, well-placed light can be a total lifesaver. The secret is to make that one light source as large and soft as you possibly can.
My go-to for this situation is a powerful strobe paired with a 4-foot octabox or a big shoot-through umbrella. Just place it directly in front of your subjects, positioned right above the camera and angled slightly downward. This creates a soft, direct light that minimizes harsh shadows and is incredibly forgiving. It's my secret weapon for cramped spaces.
A single, large light source placed close to the camera is a fantastic way to create a clean and modern look with minimal gear. It’s my go-to for events where setup space and time are limited.
The Glamorous Butterfly Light
Want to give your guests that high-fashion, magazine-cover vibe? You have to try the "butterfly" lighting technique, sometimes called Paramount lighting. This setup is famous for creating a small, butterfly-shaped shadow right under the nose, which does an amazing job sculpting cheekbones and creating a dramatic look.
To nail this, place a single light source directly in front of the subject, but raise it high and angle it down at them. You'll usually want to add a reflector below their chest, angled up, to bounce some light back and soften any shadows under the chin. This creates an incredibly glamorous and polished portrait. The specific lighting can truly transform the atmosphere, which is a key part of designing memorable wedding reception lighting.
It's worth noting that the industry's shift toward open-air booths has really forced us operators to get good at these different setups. While the old-school enclosed booths gave us a perfectly controlled environment, the popularity of open-air concepts means we constantly have to adapt to tricky venue conditions with mobile, powerful lighting.
Getting Your Camera and Lights to Play Nice
https://www.youtube.com/embed/g5uw_FCaobY
Great lights are a game-changer, but they’re just one piece of the puzzle. The real secret to a pro-level photo booth lighting setup is getting your camera and your lights to communicate perfectly. This is where you ditch "auto" mode for good and step into full creative control.
It might sound complicated, but it's really about creating a controlled environment. The goal is simple: make the venue’s lighting completely disappear so your lights are the only thing the camera sees. This is how you get those sharp, consistently beautiful photos, even if the DJ is going wild with strobes and lasers right next to you.
First, Make the Room Go Black (In-Camera)
Before you do anything else, you have to neutralize the room's ambient light. I'm talking about the purple uplighting, the dim chandeliers, or the flashing lights from the dance floor. We need a totally clean slate.
To get there, turn your photo booth lights completely off. Your mission now is to adjust your camera settings until you take a photo that is pure black.
Here’s my go-to starting point:
- ISO: Drop this down to your camera's base, which is usually ISO 100 or 200. This gives you the cleanest image possible with virtually no grain.
- Shutter Speed: With strobes, start at 1/160s. This is a safe sync speed for most cameras, meaning it won’t create that ugly black bar across your photos.
- Aperture: I usually begin around f/8. This gives you a nice, deep depth of field, which is crucial for keeping everyone in a big group photo sharp from front to back.
Snap a test shot. See any light? If it's not totally black, you can either bump your shutter speed up a bit (to 1/200s, for example) or close down your aperture (to f/9 or f/11). Keep tweaking until the photo is completely dark. Now, your camera is effectively blind to the room and waiting for your command.
Now, Add Your Light and Lock It In
With your camera settings dialed in to create a blackout, it's time to introduce your lights. Flip on your main light and take another test picture.
Is it too dark? Crank up the power on your flash. Too bright? Dial it back down. The key here is to only adjust the power of your light, not your camera settings. This keeps things simple and makes it easy to pinpoint what needs changing.
Once the exposure on your subject looks spot on, it's time to lock in your focus.
Whatever you do, don't use autofocus for a live event. Guests are constantly moving, and your camera will be "hunting" for focus all night, resulting in a ton of blurry shots. Switch your lens to manual focus (MF), have someone stand in the sweet spot, and get them perfectly sharp. Then, tape that focus ring down if you have to—just don't touch it again!
The final piece of the puzzle is white balance. Leaving it on auto is a recipe for disaster; it can shift from photo to photo, making skin tones look weirdly blue or orange. Set it to a "Flash" preset or, even better, do a custom white balance reading to guarantee consistent, natural-looking colors all night long.
Of course, the camera itself plays a massive role in all of this. For a deeper dive into gear that offers this level of manual control, check out our guide on the best camera for event photography. Following this methodical process—blackout the scene, dial in your light, lock your focus, and set your color—is the key to getting predictable, stunning results every single time.
Solving Common Photo Booth Lighting Problems
You've got everything set up, the camera settings are dialed in, and you've snapped a few test shots… but something's not quite right. It's a classic moment every photo booth operator knows well. Even with the best planning, weird shadows, annoying reflections, or patchy light can sneak into your shots.
Don't sweat it. Most of these headaches are surprisingly easy to fix once you know what you're looking for. This is your go-to guide for troubleshooting the most common lighting curveballs you'll face at an event.
Taming Harsh Shadows and Hotspots
Probably the number one issue I see is harsh, ugly shadows on people's faces. You'll know it when you see it: dark circles under the eyes (we call 'em "raccoon eyes") or a sharp shadow from one person falling onto the person next to them.
Nine times out of ten, this is because your light is too small or placed too high, pointing straight down. A small, direct light source is a recipe for hard-edged shadows.
Here’s how to deal with it:
- Bring the Light Down: Lower your light stand so the light is closer to your guests' eye level. This simple move instantly fills in those unflattering shadows under their eyes and chin.
- Make Your Light Bigger: The fastest way to get softer light is to make the source bigger relative to your subject. If you're using a softbox, just move it closer to where people are standing. Got an umbrella? Open it wider or swap it for a larger one.
Here's a little trick I've learned: a larger, closer light source always equals softer, more flattering light. Seriously, moving your main light just a foot closer can completely change the look, erasing harsh shadows and giving you that professional glow.
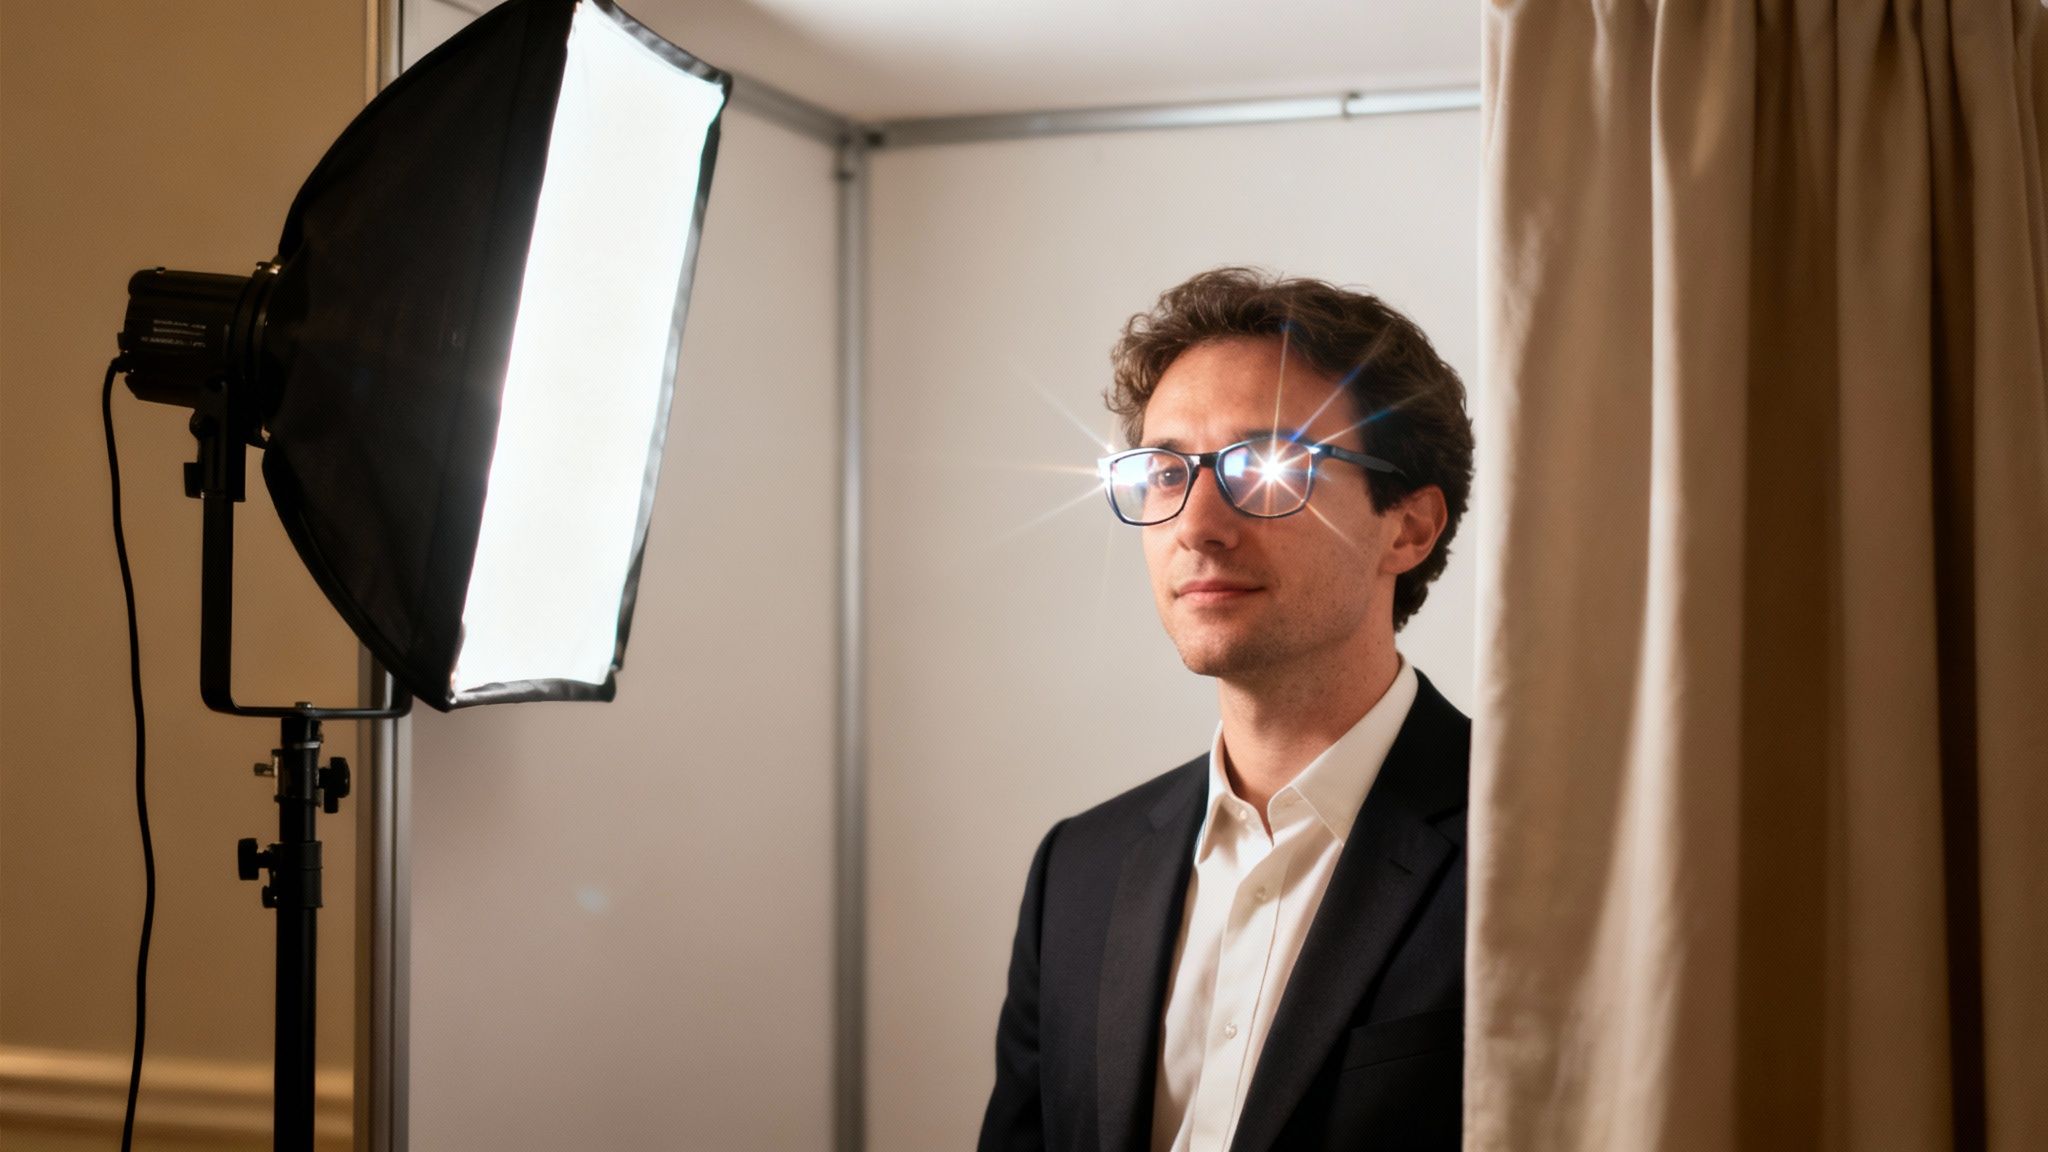
Eliminating Glare and Reflections
Ah, the dreaded glasses glare. A bright flash bouncing off someone's specs can totally ruin an otherwise perfect picture. This happens when your light is positioned directly in front of your subjects, which sends the reflection straight back into your camera's lens.
The fix is all about angles. Instead of a head-on approach, move your main light off to one side. Aim for about a 45-degree angle from the camera. This changes the "angle of incidence," making the reflection bounce away from your lens instead of right into it. It’s a simple tweak that makes a world of difference. Even with solid planning, lighting issues pop up, often calling for creative on-the-spot adjustments and various lighting fixes to save the day.
Correcting Uneven Group Lighting
Ever take a big group photo and notice the people on the ends are fading into the dark while the folks in the middle are perfectly lit? That's a clear sign your light source isn't wide enough to cover the whole group evenly.
To fix this, you just need to spread the light out. One option is to simply move your light source further back from the group, which widens its coverage. Another great solution is to add a second "fill" light on the opposite side to balance out the scene.
Sometimes, the venue's own funky lighting can interfere, but a good, strong setup can usually overpower it. But if you want to play with the venue's vibe, you can even incorporate techniques from LED up lighting to add a pop of color or drama to your backdrop.
Answering Your Photo Booth Lighting Questions
Even the most seasoned pros run into questions when setting up their lighting. Here are some of the most common things I get asked, along with my straight-to-the-point answers to help you solve those little on-site puzzles.
What's the Best Single Light for a Beginner?
If you're just starting out, my go-to recommendation is a big LED ring light—I’m talking 18 inches or larger. You almost can't go wrong. The light wraps around your subject, creating a soft, flattering look that melts away shadows with zero fuss. Plus, you get that awesome circular catchlight in the eyes.
A great alternative is a large, diffused LED panel. It gives you a similar broad, even light and is just as easy to control. Think of it as a super reliable and versatile workhorse for your first piece of serious lighting gear.
How Do I Deal With Tricky Venues?
Dark walls are a classic headache. They just eat light, forcing you to crank up your power or inch your light closer to your backdrop. Another common problem? Crazy colored lights from the DJ setup. The easiest fix is to simply turn your booth so your guests have their backs to the distracting lights.
Then, here’s the real trick: set your camera’s shutter speed to something fast, like 1/160s, and fire your flash. This technique makes your flash the dominant light source, effectively "erasing" the messy ambient light on your subjects. They’ll look clean and perfectly lit, while the background can still have some of that party vibe.
Your goal is to create a pocket of perfect light for your subjects. Use your flash to overpower the venue's lighting, and you'll always be in control.
Should I Use Continuous LEDs or a Strobe?
This really comes down to what you're trying to achieve and the features your booth offers. There's a place for both.
- Continuous LEDs: These are fantastic for beginners because what you see is what you get—no more guessing games. They're also an absolute must if you're shooting video, boomerangs, or GIFs.
- Strobes (Flashes): Strobes pack a much bigger punch. That power lets you freeze motion for incredibly sharp photos and gives you the muscle to easily overpower any ambient light in the room.
For big, professional gigs where every image has to be tack-sharp, most pros lean on strobes. That said, modern, high-quality LEDs are incredibly good and have become a super popular and flexible choice for just about any photo booth setup.
Ready to make your next event unforgettable with photos that look absolutely flawless? The team at 1021 Events lives and breathes professional event production, and that includes high-end photo booths with perfect lighting. We’ll sweat the technical details so you can enjoy the party. Find out more at https://www.1021events.com.

