

Why Your Photography Deserves a Better Backdrop
Let's be real: the difference between a casual snapshot and a pro-level photo often comes down to the backdrop. A well-chosen backdrop can seriously elevate your photography, taking everyday pics and turning them into something special. Whether it's portraits, products, or events, the background is key to the overall impact. A good backdrop helps guide the viewer's eye right where you want it, minimizes distractions, and even subtly sets the mood and adds depth.
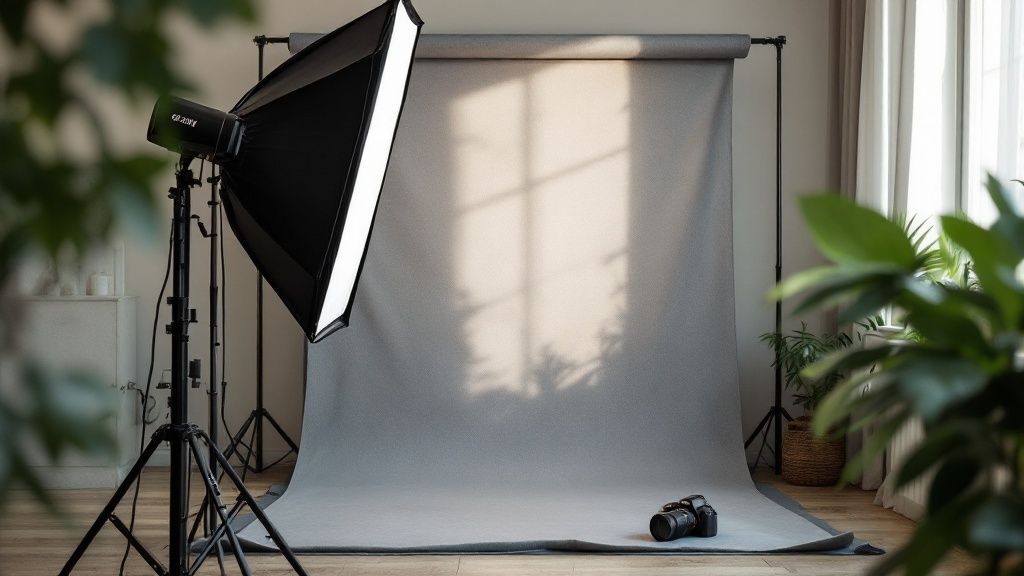
The Power of a Professional Backdrop
Professional photographers get it: backdrops are powerful. They understand how background elements affect the final image. Think about it – a softly blurred natural setting can bring a sense of depth and peace to a portrait. Meanwhile, a crisp, white backdrop makes a product pop in commercial shots. By carefully choosing or even building their own backdrops, pros make sure the background adds to the subject, not distracts from it. This is the kind of attention to detail that separates a memorable photo from one that's quickly forgotten.
Color and texture are important, too. They're secret weapons for stirring up emotions. Warm colors like reds and oranges can create a vibrant, energetic feel, while cool blues and greens evoke a sense of calm. Textured backdrops, like rustic wood or weathered concrete, add depth and visual interest. These seemingly small details all contribute to the bigger picture, literally! Creating a backdrop is a serious part of the photography business, which, by the way, is booming. The global photography services market was valued at $55.6 billion in 2023 and is expected to hit $81.83 billion by 2032. Part of this growth? Increased demand for professional services, often involving top-notch, custom backdrops. Find more detailed statistics here.
Enhancing Your Photography With DIY Backdrops
Taking the time to create great backdrops is a game-changer for your photography. Shooting family portraits? Product shots for your online store? Maybe you’re documenting special events. A well-made backdrop instantly elevates the results. Especially now, with everyone wanting personalized experiences, DIY backdrops can give you a real advantage. Learning how to make your own backdrops isn’t just about upping your photography game – it’s about gaining a competitive edge. You can create custom backdrops tailored to your exact needs and style, giving your work a unique look that grabs attention and makes it stand out.
Selecting Materials That Won't Break Your Budget
Creating awesome photo backdrops doesn't have to mean spending a fortune. Picking the right materials can give you professional-looking photos without the high price tag of pre-made backdrops. Pro photographers often choose certain fabrics because they look great in photos, but they also think about how tough the material is and how easy it is to move around. Getting smart about where you buy your materials and planning carefully can also help keep costs down.
Exploring Affordable Backdrop Options
A better backdrop can seriously upgrade your photos. This is especially important for things like real estate photography. Whether you’re shooting in a studio or out and about, the right backdrop just makes everything look better. Here's a rundown of popular materials and how budget-friendly they are:
-
Fabric: Fabric is super versatile and comes in tons of textures and colors. It’s also usually pretty cheap. The downside? Wrinkles. You'll probably need to steam or iron it. Muslin, canvas, and velvet are all popular choices, and they each have their own way of absorbing light and adding texture.
-
Paper: Paper backdrops are a really economical option if you want a smooth, seamless look. They’re perfect for product photography. You can find paper in tons of colors, and it’s easy to swap out if it gets ripped or dirty. But, paper isn't as tough as fabric or vinyl.
-
Vinyl: Vinyl is durable, water-resistant, and a breeze to clean. This makes it great for messier shoots like food photography or when you're taking pictures of kids. Vinyl is usually more expensive than paper, but you can use it over and over again, so it might be worth the extra cost.
The infographic below shows how popular different backdrop materials are. As you can see, fabric is the most popular, followed by paper and then vinyl.
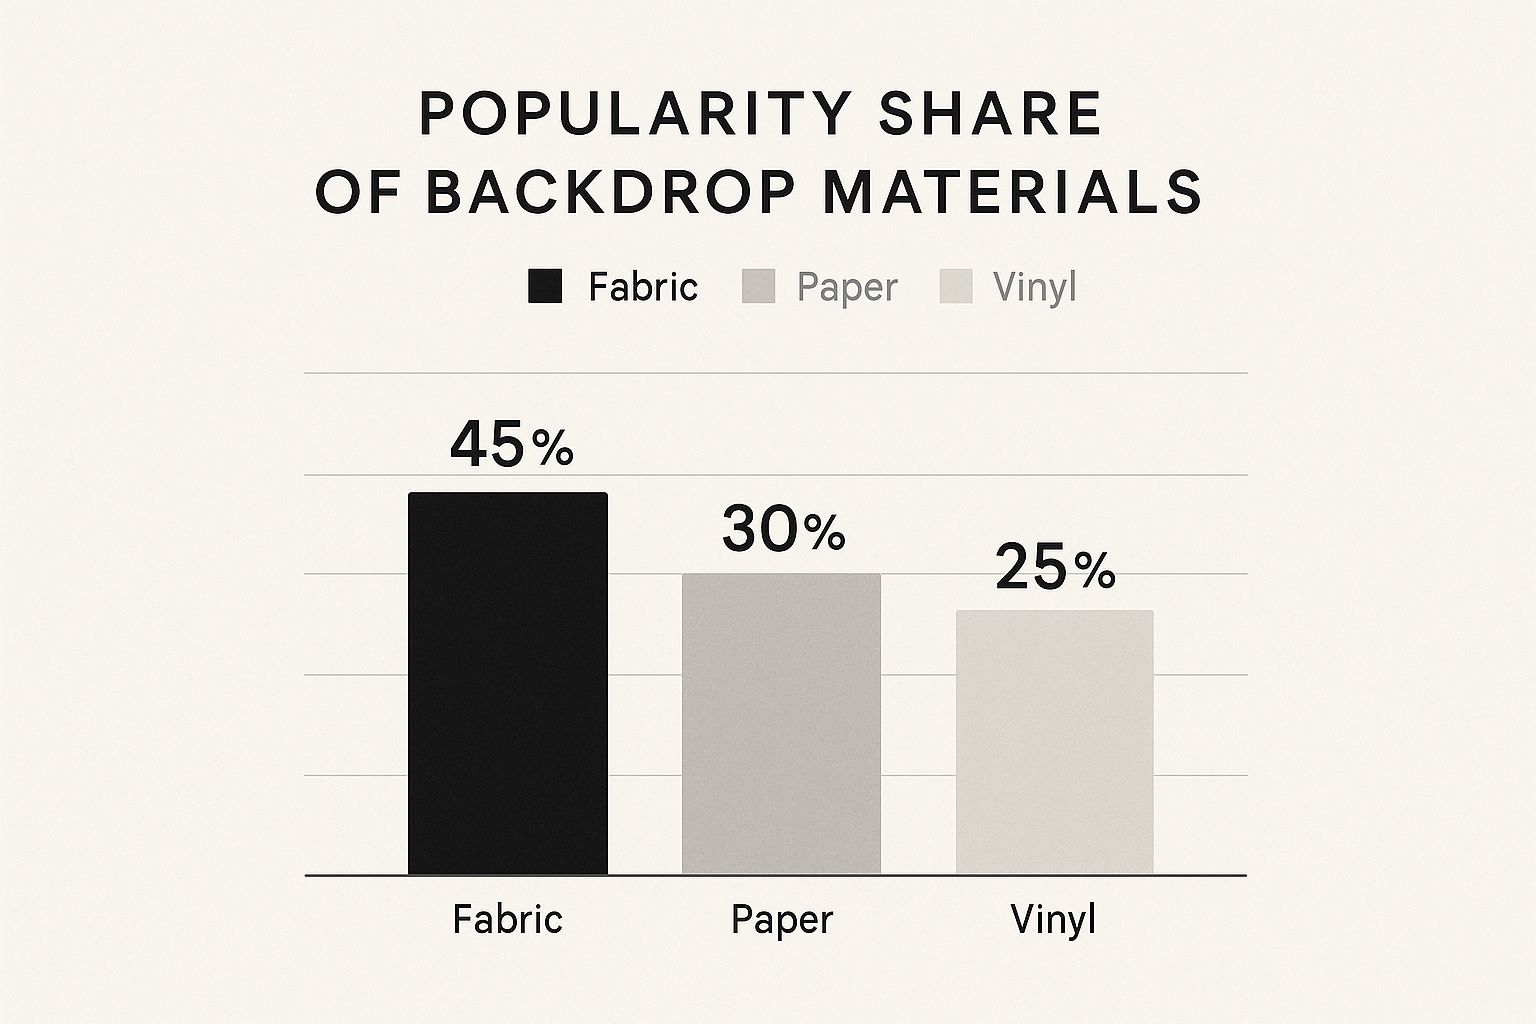
Fabric makes up 45% of backdrop choices, probably because it’s so versatile and affordable. Paper comes in second at 30%, and people like it for its smooth, clean look. Vinyl, at 25%, is a little less common, but it’s a favorite because it’s so durable and easy to clean.
Sourcing Materials and Avoiding Waste
Don't forget about repurposing stuff you already have! Old curtains, sheets, or even big rolls of craft paper can make great backdrops. Also, check your local fabric store for leftover scraps or rolls on sale. You can often snag high-quality materials for way less.
Before you buy anything, measure carefully! You don't want to buy too much or not enough. A little planning goes a long way in making sure your backdrop is the perfect size for your space.
And don’t just focus on the initial price. Think about things like whether the material wrinkles easily and how you’ll store it. Choosing materials that are easy to take care of and store will save you time and headaches down the road.
To help you decide on the best material for your needs, check out this handy comparison table:
Backdrop Material Comparison: A detailed comparison of common backdrop materials showing their benefits, limitations, and best uses
| Material | Cost Range | Durability | Portability | Best For | Limitations |
|---|---|---|---|---|---|
| Fabric (Muslin, Canvas, Velvet) | Low to Moderate | Moderate | High (depending on fabric) | Portraits, Events, Versatile use | Wrinkles easily, can be difficult to clean |
| Paper | Low | Low | Moderate (rolls can be bulky) | Product Photography, Smooth backdrops | Tears easily, susceptible to stains |
| Vinyl | Moderate to High | High | Moderate (can be heavy) | Messy shoots (food, kids), Durable backdrops | Can be reflective, more expensive initially |
This table highlights the key differences between popular backdrop materials. While fabric offers versatility and portability, it requires care to avoid wrinkles. Paper is a cost-effective choice for clean backgrounds, but it's less durable. Vinyl provides excellent durability and easy cleaning, but it comes at a slightly higher cost. Choosing the right material depends on your specific needs and budget.
Creating Fabric Backdrops That Look Expensive

Say goodbye to wrinkled sheets pretending to be backdrops! This section reveals the secrets to crafting luxurious fabric backdrops that will transform your photos from amateur snapshots to professional masterpieces. We'll cover everything from fabric selection to expert mounting techniques, ensuring your DIY backdrop rivals those pricey studio options.
Choosing the Right Fabric
Picking the right fabric is the cornerstone of a fantastic backdrop. Different fabrics play with light in unique ways, affecting the final look of your images. Muslin, for instance, is a go-to for its soft, diffused light effect. It's easy on the wallet and comes in various weights, making it super adaptable for different shoots. But be warned, it wrinkles easily, so get that steamer or iron ready.
Canvas, alternatively, offers a more textured look and absorbs light differently, adding a touch of artistry. And for a touch of drama? Velvet, with its rich texture and light-absorbing qualities, is perfect for moody, dramatic backdrops.
Wrinkle Removal and Mounting Techniques
Even the most gorgeous fabric can look cheap if it’s wrinkled. Steaming is your best bet for wrinkle removal. No steamer? A damp towel and a warm iron can work like magic. Just lay the damp towel over the fabric and gently iron, making sure the iron doesn't directly touch the backdrop.
When it comes to mounting, ditch the simple drape – it looks flat and unprofessional. Instead, create a seamless, floating effect by hanging the fabric from a backdrop stand. This creates a clean background and minimizes distractions. Use clips and clamps to create gentle waves and folds for extra depth and visual appeal.
Dyeing and Distressing for Unique Effects
Want custom colors and textures? Dyeing and distressing techniques can transform plain fabrics into unique backdrops. Fabric dye lets you achieve specific colors or create subtle gradients for added depth. For a vintage or rustic vibe, distressing techniques like sanding, tearing, or staining can add character and visual interest.
These simple methods can significantly boost the quality of your backdrops, making them truly one-of-a-kind. This attention to detail sets your photography apart, attracting clients who value personalized and creative touches. The backdrop world has kept pace with tech, too. The rise of social media and cloud storage like Dropbox affects how photographers manage and share their work, including how they use physical and digital backdrops. About 10% of photographers are branching out, experimenting with different backdrops to meet diverse client needs. Explore this topic further.
Professional Touches for Stunning Results
It's the small things that often make the biggest impact. Try backlighting for a soft glow behind the fabric, adding depth and dimension. Play around with lighting angles and intensities to see how they interact with the fabric. And don't forget a reflector to bounce light back onto your subject for a more even, professional look. These subtle adjustments can significantly elevate your photos, making them look polished and expensive. Mastering these techniques allows you to transform ordinary fabrics into stunning backdrops that enhance your photography and wow your clients.
Mastering Paper and Vinyl for Perfect Product Shots
Fabric backdrops are great, but paper and vinyl are having a real moment in product photography. They offer a unique way to create clean, simple backgrounds that let your products take center stage. Want to learn how to get professional results without breaking the bank? Let's dive into the world of paper and vinyl backdrops.
Exploring the Benefits of Paper and Vinyl
Paper backdrops are known for their smooth, seamless surface. This is perfect for showcasing products without any distracting textures in the background. Plus, you can find paper in practically any color, so matching your backdrop to your product is a breeze. It's also a super budget-friendly choice, especially for one-time uses or when you think the backdrop might get a little beat up. Just remember, paper can be delicate, so handle with care to avoid tears and creases.
Vinyl, however, is the king of durability and water resistance. This makes it a lifesaver for food photography, where spills are just part of the job, or for shoots with kids. Cleaning vinyl is also easy peasy, which means you can use it again and again. It's a smart investment that pays off in the long run. And that smooth, non-reflective finish? It's a secret weapon for pro-level product shots.
Creating Professional Effects With Paper and Vinyl
Paper and vinyl backdrops offer so much more than just solid colors. Gradients, for example, can add a sense of depth and visual interest, giving your photos that fancy studio look without the high-end price tag. Smoothly blending colors creates a sophisticated backdrop that elevates your product presentation. Textured paper and vinyl are another great option for getting creative and matching the backdrop to the product's style.
It's interesting to note that the demand for high-quality backdrops, particularly for commercial photography, is huge in North America, which holds a whopping 28% of the global photography market. This makes sense, given the region's tech-savvy population and the amount of money spent on professional photography. Discover more insights about photography trends here.
Handling and Mounting Large Sheets
Working with big sheets of paper or vinyl can be a bit of a challenge. Proper handling is key to avoiding creases and damage. Storing rolls vertically helps prevent bending and warping, and taking your time to unroll and mount the backdrop will keep it smooth and wrinkle-free. For a seamless sweep transition, a popular look in product photography, secure the backdrop to a curved surface. This creates a clean line from vertical to horizontal and gives your products that professional, floating-in-mid-air effect.
Digital Printing and Custom Designs
Want to turn your product photos into branded marketing gold? Digitally printed custom designs on vinyl can do just that. You can add intricate patterns, logos, and text, turning your backdrop into a marketing powerhouse. This personalized touch is perfect for product launches, social media campaigns, and event photography, helping to build a strong and consistent brand experience. From subtle textures to bold graphics, the possibilities are endless. By mastering these techniques, you can create backdrops that not only look amazing but also effectively communicate your brand message. Whether you're shooting basic product photos or elaborate campaigns, paper and vinyl are must-have tools for any photographer.
Painted and Textured Backdrops That Tell a Story
Going beyond the basics opens up a world of custom backdrops. These unique creations can seriously level up your photography. Let's dive into some techniques used by editorial photographers to craft painted and textured backdrops that clients love. You'll discover how to get a range of finishes, from weathered concrete to rustic wood, using everyday tools and maybe even a few surprises from around the house.
Achieving Realistic Textures
The secret to a believable backdrop often lies in the texture. Imagine the rough feel of concrete or the grain of old wood. These details add depth and make an image more interesting. For example, to fake that weathered concrete look, you can mix joint compound and paint, applying it with a sponge or trowel for a textured finish. Want a wood effect? Grab a wood grain rocker. It's a simple tool that makes realistic wood grain patterns in paint or plaster. Believe it or not, even crumpled aluminum foil can create impressions in wet paint for a cool metallic effect. These methods, done right, create backdrops that look pro, not DIY.
The Magic of Color Layering
Color layering is another trick pros use. Applying several paint layers gives you depth and dimension that one coat just can't. Begin with a base coat, then slowly build up layers in different shades. This copies the natural variations you see in real textures and brings your backdrop to life. For a concrete effect, try a dark gray base, then sponge on lighter gray for a weathered look. For wood, layering browns with hints of black or gray can create that perfect aged look. This layering adds a richness that really makes your backdrop pop.
Incorporating Subtle Textures
Texture doesn't have to be in-your-face to look good. Subtle textures can add character without being distracting. Think of the slight roughness of linen or the fine grain of sanded wood. These add visual interest without stealing the show. Try techniques like dry brushing, spattering, or even applying textured fabrics to your backdrop before painting. It's an extra detail that enhances the whole effect.
Avoiding Common DIY Mistakes
A great backdrop can truly elevate your photos, much like how a well-chosen backdrop enhances the photo booth experience, as explained by Toast Entertainment. One common mistake is using materials that cause glare or reflections. Test your backdrop under various lighting to avoid this. Another trap is overdoing the texture. While texture is good, too much can be distracting. Find a balance that complements your subject, not overwhelms it. Finally, don't forget a sturdy support system. A flimsy stand can ruin your shoot, so invest in something reliable.
Creating Your Most Requested Styles
Here's a table to get you started with some popular backdrop textures:
Texture Creation Techniques
Overview of methods to create different texture effects for photography backdrops
| Desired Effect | Materials Needed | Technique | Drying Time | Difficulty Level |
|---|---|---|---|---|
| Weathered Concrete | Joint compound, gray paint, sponge | Apply joint compound, then sponge on paint layers | 24-48 hours | Beginner |
| Rustic Wood | Brown paint, wood grain rocker | Apply base coat, use rocker for grain | 12-24 hours | Intermediate |
| Textured Metal | Metallic paint, aluminum foil | Crumple foil, press into wet paint | 6-8 hours | Beginner |
This table provides a simple overview of various techniques and their corresponding difficulty levels and drying times. Experimenting with different materials and techniques will expand your repertoire and allow for even more creative backdrop designs.
By mastering these techniques, you can make custom backdrops that take your photography to the next level and impress your clients. These backdrops can even become your signature style, just like how custom photo backdrops with photo booths offered by 1021 Events personalize the experience for their clients. Remember, a well-made backdrop is more than just a background; it's an essential part of telling a story.
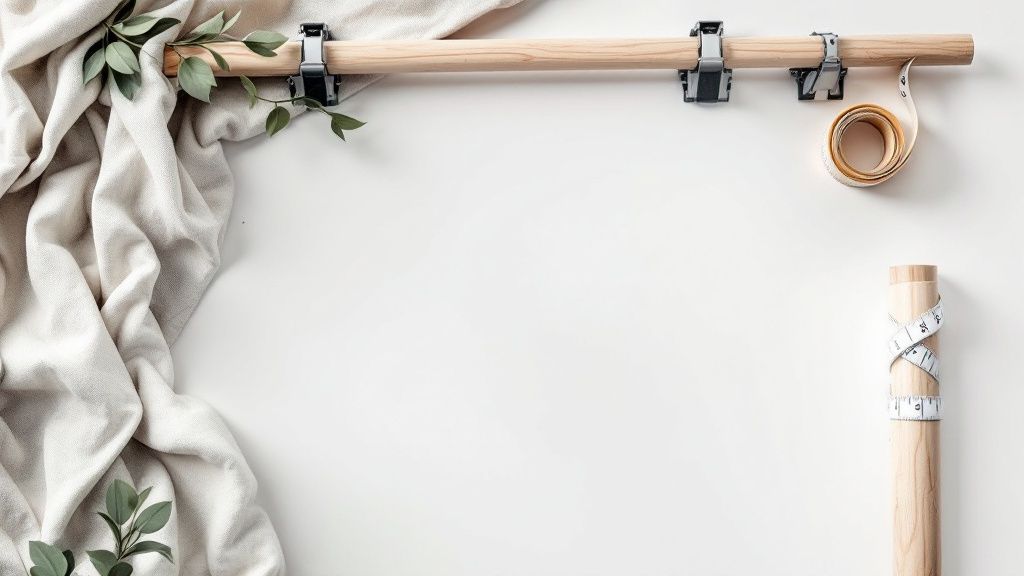
Building Support Systems That Actually Last
A killer backdrop is essential, but it's all for nothing if the whole thing collapses mid-shoot! We've chatted with seasoned photographers and put together some practical and reliable ways to support your backdrops. Whether you're a DIY enthusiast or prefer a professional studio setup, these solutions will prevent disasters and protect your hard-earned work.
Budget-Friendly PVC Frames
PVC pipes offer a surprisingly strong and affordable way to support your backdrops. These frames are super lightweight, easy to put together, and incredibly versatile. You can whip up a basic PVC frame in minutes with just a few connectors and pipes. It's perfect for photographers who need a portable and budget-friendly option.
- Materials: PVC pipes, PVC connectors, measuring tape, saw.
- Assembly: Measure and cut the PVC pipes to the size you need. Then, connect the pipes with the connectors to create a rectangular frame. Easy peasy! This simple frame can be adjusted to fit different backdrop sizes.
- Benefits: Cost-effective, simple assembly and disassembly, lightweight and portable.
Studio-Quality Permanent Solutions
If you're looking for a more permanent setup, consider building a wooden frame. This provides much greater stability and durability, which is ideal for a studio environment. You can also customize wooden frames to fit specific backdrop sizes, or even incorporate them into your overall studio design. It’s an investment that provides a reliable and long-lasting backdrop support system.
- Materials: Wooden planks, screws, measuring tape, saw, wood glue.
- Assembly: Measure and cut the wooden planks to your desired size. Assemble the frame with screws and wood glue for extra strength. This sturdy frame provides excellent support for heavier backdrops.
- Benefits: Durable, stable, customizable, and can be integrated into your studio design.
Calculating Dimensions and Weight Capacity
Before you build anything, think about the weight and dimensions of your backdrop. This will help ensure your support system can handle the weight without buckling under pressure. For heavier materials like canvas or velvet, a stronger frame made of wood or metal is a good idea. Lighter materials like muslin or paper can be supported by PVC or lighter wooden frames. Figuring out the right dimensions and weight capacity will save you from mid-shoot disasters and protect your backdrop investment.
Space-Saving Storage for Multiple Backdrops
Keeping your backdrops organized and protected is crucial. A rolling backdrop stand is a popular choice. They make it easy to move and store multiple backdrops, especially if you switch between them often or work in a small space. Wall-mounted storage systems are another great way to keep everything organized and easily accessible. And if you're selling painted or textured backdrops, consider how you present them to customers. Food Packaging Printing offers some cool ideas on visually appealing presentation methods that you could adapt for your backdrop storage and display. These storage solutions will keep your backdrops in great shape and ready for your next photoshoot.
Troubleshooting Like a Pro: Saving Difficult Shoots
Even the most experienced photographers sometimes have problems with their backdrops. This section gives you the tools and techniques you need to handle those unexpected challenges and save your shoot, even when it seems like everything's going wrong. We'll cover pro tricks for fixing common backdrop issues, adapting to tricky locations, and even look at real-life examples of photographers who’ve turned backdrop disasters into wins.
Rescuing Wrinkled Backdrops
Wrinkles are a backdrop’s nemesis. They can make even the priciest fabric look cheap and amateur. If you’re facing stubborn wrinkles minutes before your client shows up, don't freak out! A handheld steamer is your new best friend.
For deeper creases, grab a damp towel and a warm iron. Lay the damp towel over the wrinkled fabric and gently iron it, making sure the iron doesn't directly touch the backdrop. This quickly relaxes the fibers and smooths out those wrinkles. For a super-fast fix, a wrinkle-release spray can work wonders, especially on lighter fabrics.
Tackling Lighting Challenges
Unexpected lighting problems can totally mess up your shoot. What if your backdrop is too bright, too dark, or the colors look washed out? Light meters are essential for perfect lighting. These handy tools measure light intensity, so you can adjust your camera settings for the best exposure.
Another pro tip is to use reflectors. Reflectors bounce light back onto your subject, softening shadows and creating a more balanced look. If you're shooting outside in harsh sunlight, diffusers can soften the light and reduce harsh shadows. Mastering light is key to great photos, regardless of the backdrop.
Making Emergency Repairs
Accidents happen. Rips, tears, and stains can wreck your backdrop. A fabric repair kit is a lifesaver for small tears and rips. For larger damage, gaffer tape can temporarily hold things together until you can fix it properly.
If you get a stain, act fast. Blot it gently with a clean cloth – don't rub, as this can make it worse. A mild detergent and water solution often works for stubborn stains. Of course, preventing damage is always better than fixing it, so handle your backdrops carefully and store them correctly.
Adapting to Venue Limitations
Not every location is perfect for photography. Limited space, awkward layouts, and unexpected obstacles can make setting up your backdrop a real pain. Before your shoot, check out the location and look for potential problems.
If space is tight, consider a smaller backdrop or a collapsible backdrop stand. Awkward layouts might require creative solutions – use walls, furniture, or even natural elements to your advantage. Being flexible and resourceful can turn a difficult venue into something special.
Learning From Real-Life Experiences
Even pros run into backdrop problems. Learning from their mistakes can save you time, money, and frustration. For example, one photographer shared how a sudden gust of wind knocked over their backdrop stand during an outdoor shoot. They quickly adapted by weighing down the stand with sandbags and using clamps to secure the backdrop, saving the day. These real-world stories show how important it is to be prepared for anything and think on your feet.
Implementing Preventative Maintenance
Taking care of your backdrops saves money and ensures they're always ready for your next photoshoot. Regularly check them for damage and fix anything promptly. Clean your backdrops according to the manufacturer’s instructions, and store them properly in a cool, dry place. By taking these preventative measures, you’ll avoid costly replacements and keep your backdrops looking great.
Creating memorable experiences is what 1021 Events is all about. Just like how we've covered troubleshooting backdrop issues, 1021 Events handles all the details so your event runs smoothly. From custom photo backdrops and photo booths to professional DJ services and stunning visual effects, they create unforgettable moments.

