

Let's be real—venue lighting is one of those things that can completely make or break the vibe of your wedding. But let's also be real about the price tag that often comes with professional lighting packages. Ouch. This is exactly why do it yourself uplighting for weddings has become such a game-changer for so many couples. Taking the lighting into your own hands gives you the creative freedom to design a truly personal atmosphere without blowing your budget.
Why DIY Uplighting Is Your Wedding's Best Kept Secret
Good lighting does so much more than just light up a room. It sets a mood, brings architectural details to life, and gives your wedding photos that professional, polished look. For a long time, getting that high-end, atmospheric glow meant hiring expensive event production companies. But that's not the case anymore. Smart, creative couples are figuring out just how powerful a hands-on approach can be.
This isn't about cheaping out or settling for a second-rate look. It’s about injecting your personality into one of the most important days of your life. When you're in charge of the lighting, you get to decide exactly what to highlight—whether it’s the beautiful columns of your venue or the sweetheart table. You choose the colors that will wash over the walls and control the energy of the room from the "I do's" to the last dance.
Gain Creative Control and Personalization
Going the DIY route means you aren't stuck with a vendor's cookie-cutter packages. You can play around with different placements and color combinations until it perfectly matches your vision. Dreaming of a warm, romantic amber glow for dinner that transitions into a vibrant magenta for dancing? You can absolutely make that happen.
There's a special kind of satisfaction that comes from stepping back and seeing a room transformed by your own design. It’s a personal touch your guests will remember, and something you'll appreciate in your wedding photos forever.
See Significant Cost Savings
The money you can save is a huge plus. The DIY wedding lighting trend has exploded, with searches for related ideas jumping by 35% on sites like Pinterest. The average cost to rent a single uplight for a DIY setup is just $20 to $40. Compare that to professional packages, which can easily run anywhere from $500 to $2,000, and the savings become pretty clear.
For a little inspiration on how to get that high-end look on a budget, check out our guide on stunning wedding uplighting ideas.
This approach lets you shift thousands of dollars toward other wedding priorities, like incredible entertainment or that dream honeymoon, all without sacrificing the magical ambiance you’ve been picturing. It's the perfect way to be resourceful while still achieving a stunning, professional-looking result. You can learn more about the rising popularity of DIY wedding decor and see just how much you can save.
Choosing the Right Uplighting Gear for Your Venue
Diving into lighting rentals can feel like learning a new language, with jargon like "RGBA" and "beam angle" flying around. But honestly, picking the right gear for your DIY wedding uplighting is way easier than it sounds. It really boils down to one big decision first: wired or wireless uplights.
Wired vs. Wireless Uplights: The Big Decision
Think about your venue for a second. Is it a charming historic ballroom with stunning architecture but, like, three electrical outlets in the whole place? If so, battery-powered wireless uplights are going to be your absolute lifesaver. They give you the freedom to put light literally anywhere you want—behind columns, under the sweetheart table, or all the way up a grand staircase—without a single cable to worry about.
Now, if you're in a more modern spot with outlets everywhere, traditional wired uplights are a fantastic, budget-friendly choice. You'll spend a little extra time taping down cables to keep things neat and safe, but you get the peace of mind knowing they'll run strong all night long. No battery anxiety here.
This infographic is a great gut check to see if DIY is even the right path for you based on what your venue already provides.
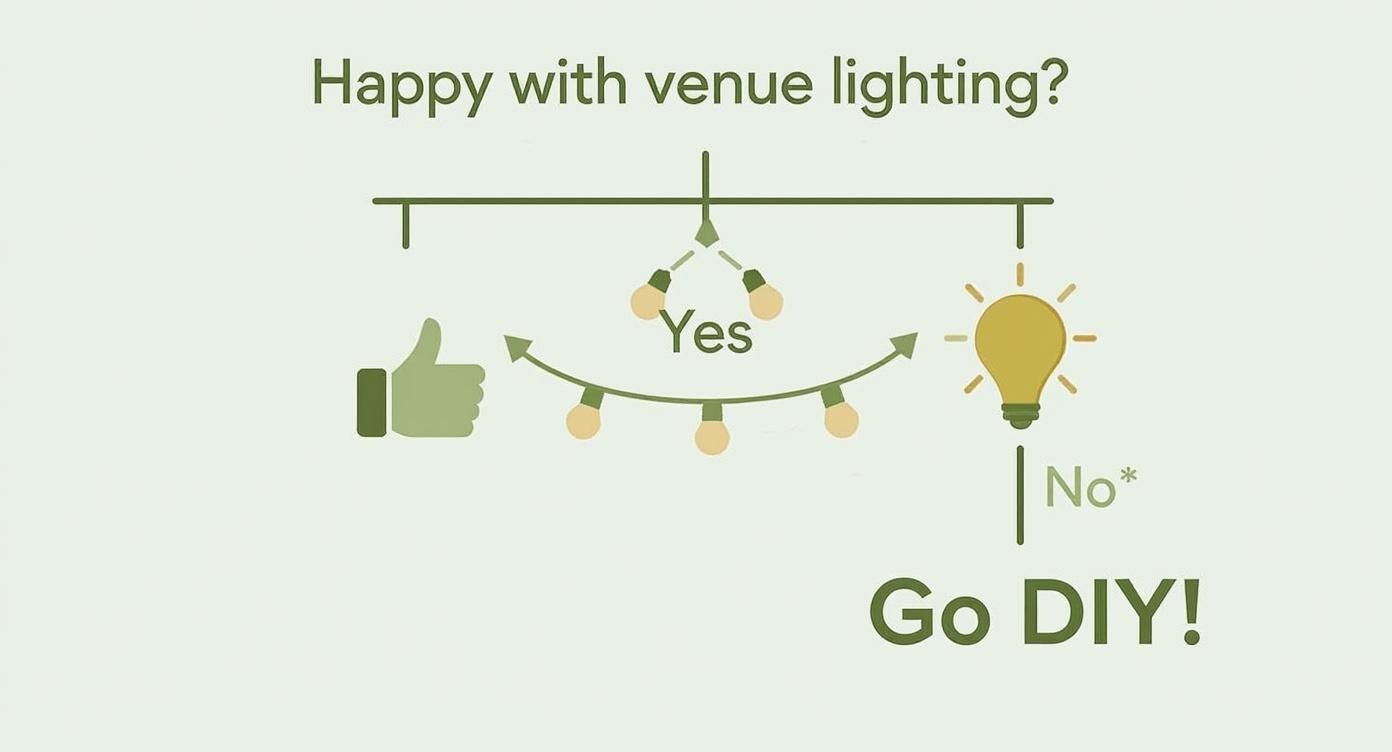
As you can see, if the venue's lighting doesn't match your vision, taking matters into your own hands is the best way to craft the perfect atmosphere.
To make the wired vs. wireless choice even clearer, let's break down the pros and cons side-by-side.
Wired vs Wireless Uplights: Which Is Right for You?
| Feature | Wired Uplights | Wireless (Battery-Powered) Uplights |
|---|---|---|
| Placement | Limited by outlet proximity and cable length. | Place them absolutely anywhere. Ultimate flexibility. |
| Setup Time | Longer. Requires running and taping down cables. | Super fast. Just place them and turn them on. |
| Cost | Generally more budget-friendly per light. | Higher rental cost due to battery technology. |
| Appearance | Cables can look messy if not properly hidden or taped. | Clean, professional look with no visible cords. |
| Reliability | Consistent power all night long. No worries about batteries dying. | Most run 6-8 hours on a full charge, but you need to manage battery life. |
| Best For | Modern venues with ample power, tight budgets, long events. | Historic venues, outdoor spaces, quick setups, achieving a flawless look. |
Ultimately, your venue's layout and your personal priorities will steer you in the right direction. There's no wrong answer, just the one that works best for your day.
Decoding the Tech Specs So You Sound Like a Pro
Once you've picked your power source, you'll run into a few other specs. Getting a handle on these will make you feel way more confident when you're booking your rentals.
First up is color. Most uplights today are LED, which is awesome because they can create millions of colors. You’ll see these acronyms pop up:
- RGB: This stands for Red, Green, and Blue. These are the classic primary colors of light and can mix to create a ton of different hues. Their only weakness? They can struggle to make a really pure white or a warm, golden amber.
- RGBA: Red, Green, Blue, Amber. That little "A" for amber is a total game-changer for weddings. It’s the secret to creating those warm, romantic glows and soft pastels that look so incredible in photos.
- RGBWA-UV: Red, Green, Blue, White, Amber, and Ultraviolet. These are the top-of-the-line fixtures. The dedicated white LED makes for a crisp, brilliant white, and the UV (blacklight) effect can make the bride's dress or other white decor pop in a really cool way.
My two cents? For most weddings, RGBA lights are the sweet spot. They offer the perfect blend of color variety and value, letting you create anything from a soft candlelight vibe for dinner to a high-energy dance floor later on.
Don't Forget Beam Angle and Brightness
The last piece of the puzzle is the beam angle. This just tells you how wide or skinny the column of light will be. A narrow beam, maybe 15-20 degrees, is perfect for shooting a tight ray of light up a tall pillar or creating dramatic stripes on a wall. A wider beam, like 30-45 degrees, is what you want for washing a whole wall or a backdrop in a soft, even layer of color.
Finally, think about brightness, which is usually measured in watts. Higher wattage means a brighter light. This is super important if you're in a huge room with high ceilings or if your reception starts when it's still light outside. You need enough power to make an impact. If you want to get into the nitty-gritty, you can learn more about the different types of LED uplights available for events and how their specs translate to real-world results. A little homework here ensures you get the perfect fixtures for your space.
Designing Your Wedding Lighting Layout
Okay, this is where the real fun starts. You've got a handle on the gear, and now it's time to put on your artist's hat and design a lighting layout that truly brings your wedding vision to life. The absolute best way to kick off your do it yourself uplighting for weddings plan is to walk through your venue with a fresh set of eyes, specifically looking for features just begging to be highlighted.
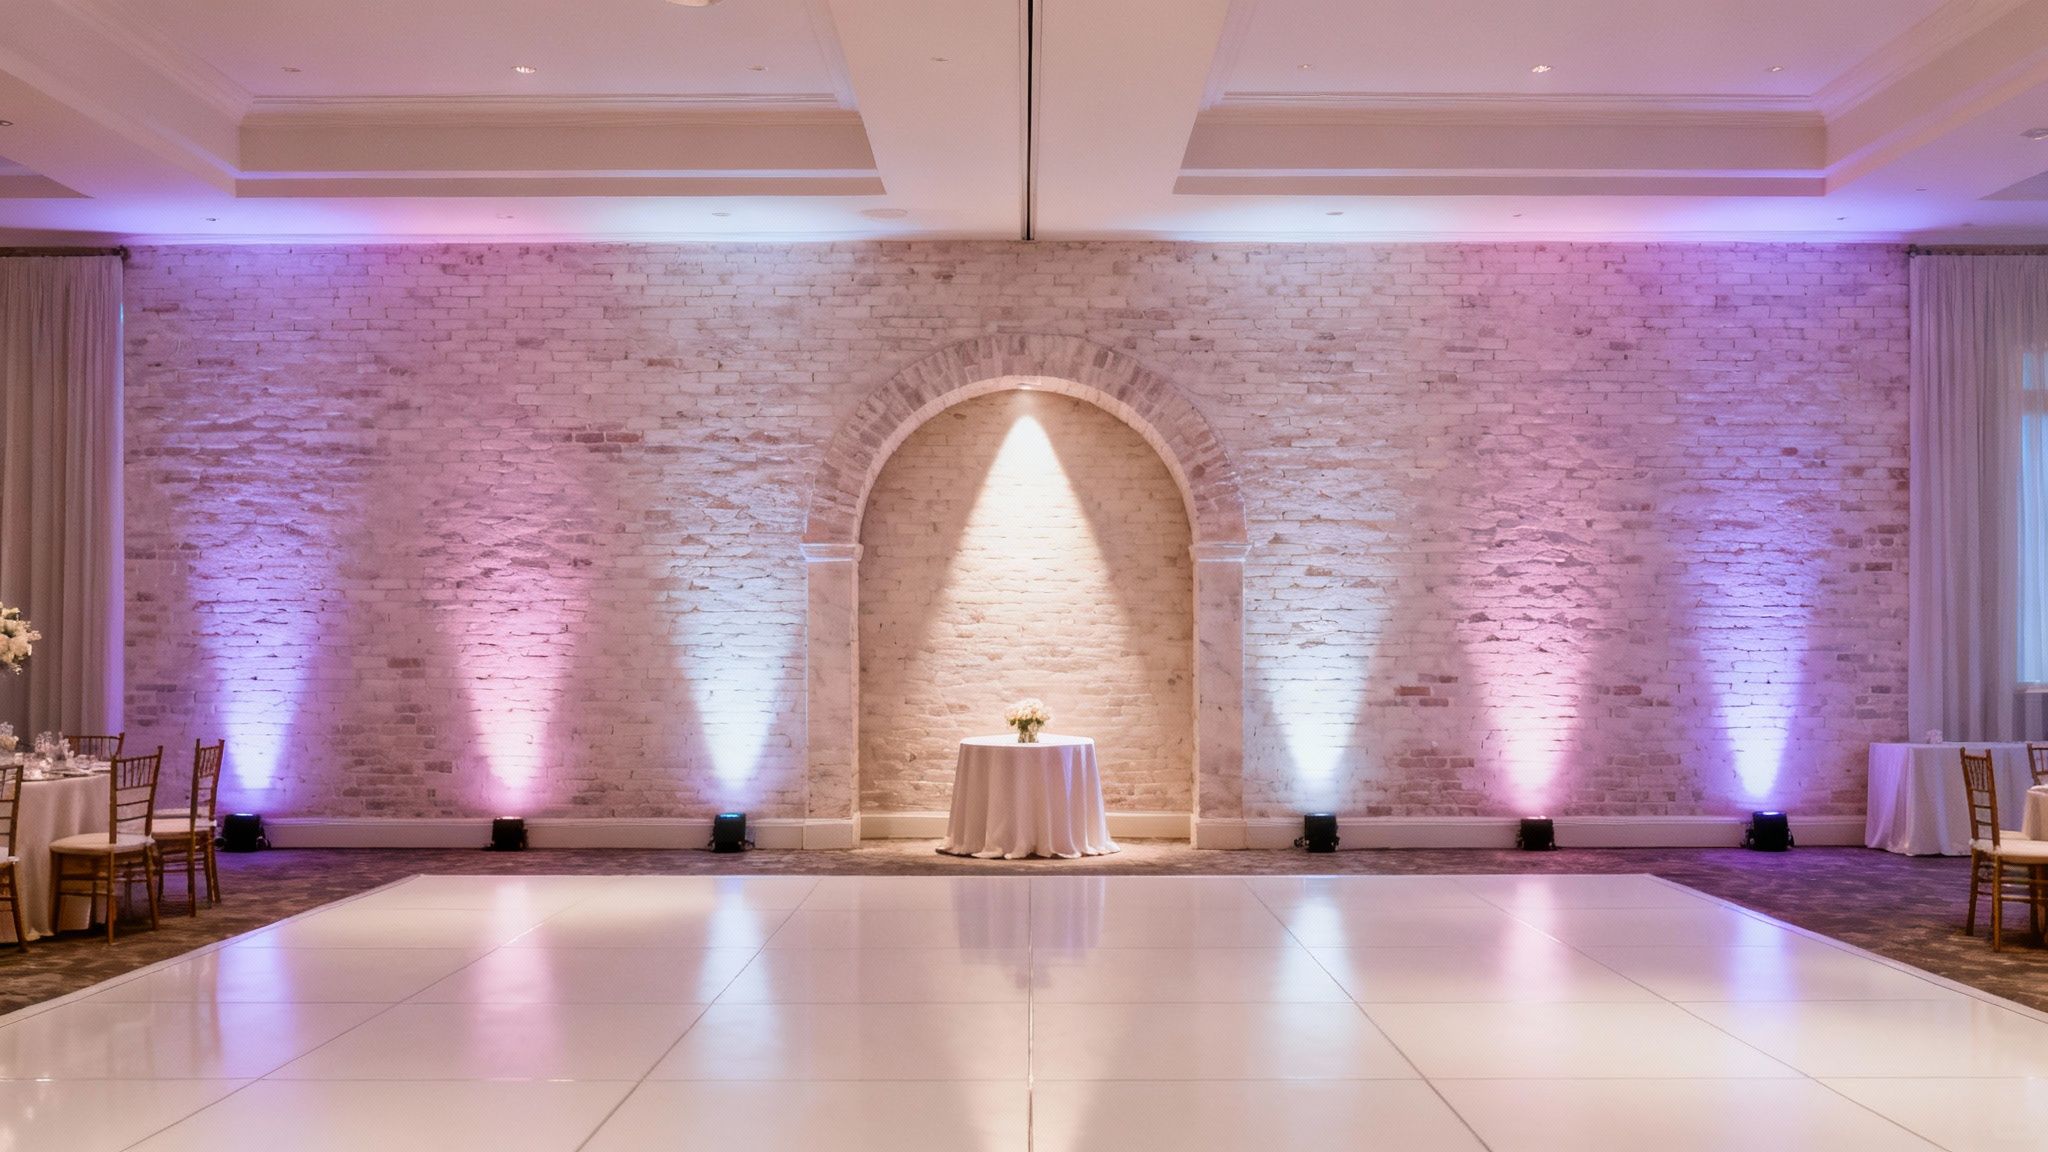
Forget about just spacing lights evenly around the room. Instead, hunt for those architectural details that give the space its character. Got a cool textured brick wall? Elegant columns? A grand fireplace or a beautiful archway behind the head table? These are all prime real estate for uplighting. Hitting these features with light adds a ton of depth and gives the whole room a sophisticated, high-end feel.
Choosing Your Wedding Colors
When it comes to setting a mood, color is everything. The right shades can make your venue feel warm, romantic, and inviting, while the wrong ones can feel a little jarring or just… off. Your safest bet is to pick colors that already play nicely with your wedding palette—think about the bridesmaid dresses, floral arrangements, and linens.
A classic amber or a soft, warm white is almost always a knockout choice for dinner. It creates this incredibly intimate, candlelit vibe that feels magical. Later on, for the reception, you can totally switch things up to a more vibrant color like a rich magenta or a deep blue to signal it’s time to hit the dance floor. If you need more ideas, our guide on the best uplighting colors is packed with inspiration.
As you map out your lighting, really think about the overall vibe you're going for. A little research into understanding color temperatures like warm and cool white can make a huge difference in achieving the perfect mood.
Pro Tip: Try not to go overboard with the colors. Sticking to two or three complementary shades keeps things looking elegant and intentional. Too many colors at once can start to feel more like a circus than a wedding.
Creating Washes Versus Focal Points
When you're placing your lights, you’re generally working with two main strategies: creating a "color wash" or creating "focal points." One isn't better than the other; they just do different jobs. In my experience, the most stunning lighting designs use a mix of both to create a really dynamic and layered look.
A color wash is pretty much what it sounds like. You space your lights out evenly along the walls—usually about 10 feet apart—to bathe them in a consistent, soft glow. This is a fantastic way to completely transform a plain or neutral-colored ballroom.
Creating focal points, on the other hand, is more like using a spotlight. You’re using individual lights to deliberately draw everyone’s attention to key elements in the room. This technique is perfect for making specific things pop and guiding your guests' eyes right where you want them.
So, where should you create these dramatic focal points? Here are a few spots that always work well:
- Behind the Head Table: Placing two to four lights behind the main table creates a gorgeous backdrop that frames you and your new spouse in photos.
- The Cake Table: A single, well-aimed uplight makes the wedding cake look like a true work of art.
- The Grand Entrance: A couple of lights on either side of the main entryway makes for a dramatic welcome for your guests and, of course, for your own big entrance.
- The Dance Floor: Aiming a few lights toward the perimeter of the dance floor injects so much energy and makes it feel like the place to be.
Your Guide to a Flawless Lighting Setup
Alright, you've got your gear and your lighting map. Now for the fun part: bringing it all to life. This is where all that planning really pays off, transforming a room from ordinary to absolutely stunning. Don't sweat it—pulling off your own do it yourself uplighting for weddings is totally manageable when you have a solid plan.

Before you even think about plugging anything in, chat with the venue manager. Find out the absolute earliest you can get into the space. The sweet spot is after the tables and chairs are in place, but before the linens and centerpieces come out. This gives you a clean slate to work with, free of obstacles.
The Setup Sequence That Saves Time
The key to an efficient setup is to work methodically. My advice? Do a full lap of the room, dropping each light fixture in its designated spot based on your layout map. Don't worry about power yet—just get the hardware in position first.
With the lights placed, you can now focus on power. If you sprung for wireless uplights, your job is pretty much done. Just flip the switch. For wired lights, you'll want to run your extension cords neatly along the baseboards, daisy-chaining the fixtures to the closest outlets.
My number one tip for a professional-looking setup? Use gaffer tape, not duct tape. Seriously. Gaffer tape is made for this stuff—it holds cables down securely but peels right off at the end of the night without leaving that gross, sticky mess on the venue's floors.
Make sure you tape down every single inch of cable that crosses a path where people will walk. A loose cord looks sloppy, sure, but more importantly, it's a huge tripping hazard for guests and vendors. The goal is to make the cables disappear.
Programming Your Colors and Final Checks
Once everything has power, you get to play with the colors. Most modern LED uplights have a little digital menu on the back. It’s super easy to scroll through preset colors or even mix your own custom shades right on the unit.
Go ahead and set all the lights to your main color—that warm amber for dinner, for instance. If you're renting from a good company, they might even include a simple remote that can change every light at once. This makes it a snap to switch the mood from dinner to dancing with the push of a button. If you want to see what's out there, checking out different event lighting rental packages can show you just how easy modern gear is to use.
The last and most important step is the walkthrough. Kill the house lights, stand back, and take it all in. Walk the entire room and look at your work from every possible angle to catch any little issues.
- Dead Spots: Notice any dark, sad-looking corners that could use a little love?
- Hot Spots: Is one light too close to a wall, creating a distracting, overly bright glare? Just pull the fixture back a few inches to soften the beam.
- Color Consistency: Take a quick glance to ensure all the lights are the exact same shade. It’s easy for one to be on a slightly different setting by mistake.
- Guest Sightlines: Plop down in a few different chairs, especially around the perimeter. The last thing you want is a light shining directly into someone's eyes all night.
This final check is what truly makes the difference between an amateur job and a polished, professional look. It’s your opportunity to tweak the details and ensure the room is absolutely perfect before the doors open.
Common DIY Lighting Mistakes and How to Fix Them
Even with the best-laid plans, things can go a little sideways on the big day. But don't sweat it—most of the common hiccups with do it yourself uplighting for weddings are surprisingly easy to solve. Knowing what to watch for means you'll be ready to troubleshoot on the fly and keep your venue looking incredible.
One of the first things people get wrong is creating harsh, distracting "hot spots." You know the look—an intense, glaring circle of light on the wall instead of that soft, elegant glow. This almost always happens when a fixture is placed too close to the surface.
The fix? It couldn't be simpler. Just pull the base of the light about 6 to 12 inches away from the wall. That tiny bit of extra distance is all it takes for the beam to spread out and soften, giving you that beautiful, even wash of color you wanted in the first place.
Another classic vibe-killer is messy cables. Nothing cheapens an otherwise stunning setup like a web of black cords running all over the floor. If you're using wired uplights, gaffer tape is your best friend. Seriously, don't use duct tape unless you want to spend hours cleaning up sticky goo. Methodically tape down every cord along the baseboards, making sure they're flat and completely secured to avoid a nasty tripping hazard.
Not Using Enough Lights
This one is a classic rookie move: underestimating how many lights you actually need. When you rent too few fixtures, the result is a patchy, unfinished look with sad, dark gaps between the columns of light. It’s a surefire way to diminish that "wow" factor you were aiming for.
As a general rule, you’ll want to place one uplight every 10-15 feet to get that seamless, immersive color wash. If you're working with a huge ballroom or have a lot of columns and archways to highlight, you'll definitely need more. Trust me on this: it’s always better to rent two or three extra lights than to come up short. Often, the difference between "nice" and "absolutely breathtaking" is just a handful of extra fixtures.
The goal is to make the lighting feel intentional and complete. Dark corners can make a room feel smaller and less inviting, completely undermining the effect you worked so hard to design.
Color Overload and Safety Oversights
I get it, it’s tempting to throw all your favorite colors into the mix. But a rainbow of different hues can quickly turn your elegant affair into a chaotic, carnival-like scene. To keep things sophisticated, stick to just one or two complementary colors for your main lighting design.
If you want more energy for the party, you can always program a third, more vibrant color to kick in when the dance floor opens. The visual shift is fantastic. You can see just how powerful these transformations are in these uplighting before-and-after photos.
Finally, please don't forget basic safety. Before you even plug anything in, just do a quick walkthrough and think through potential problems. Are any cords in a high-traffic path? Are you about to overload a single power outlet? Using simple tools like essential risk assessment checklists can help you spot these issues ahead of time, ensuring your setup is not only beautiful but also completely safe for you and your guests.
Got Questions About DIY Wedding Uplighting? Let's Talk.
We've walked through the whole process, but I know you probably have a few more things on your mind. It's totally normal. Here are the most common questions I get from couples who are tackling their own do it yourself uplighting for weddings. Think of this as our final chat to make sure you're feeling 100% ready.
How Many Uplights Do I Actually Need for My Venue?
Okay, this is the big one. While there's no single magic number, a really solid rule of thumb is to place one uplight every 10-15 feet along the walls you want to color. This spacing gives you that beautiful, continuous wash of light without any weird, dark gaps.
For a standard ballroom—say, around 2,500 square feet—you’re probably looking at a package of 12 to 20 lights. That's usually the sweet spot. Don't forget to add a light for any special features you want to make pop, like pillars, the sweetheart table, or the cake.
A little pro tip from years of experience: Always rent a couple more lights than you think you'll need. Seriously. Having a spare or two is a lifesaver if one decides to be fussy or you find a surprise dark corner that just kills the vibe.
Can I Use Uplighting for an Outdoor or Tented Wedding?
You absolutely can, and it looks incredible! The key is using the right equipment. You can't just drag indoor lights outside and hope for the best.
You'll need to rent fixtures specifically rated for outdoor use. Look for something with an IP rating, like IP65, which means it’s built to handle dust and rain.
For tents and open-air spaces, battery-powered wireless uplights are your best friend. They completely remove the nightmare of finding outlets and taping down miles of extension cords. You can place them anywhere—lighting up tent poles, trees, or the fabric ceiling to create a truly magical atmosphere.
When's the Best Time to Set Everything Up on the Big Day?
Timing is everything. The first thing you need to do is chat with your venue coordinator and find out the absolute earliest you (or a trusted friend) can get into the room.
The perfect time to set up is after the tables and chairs are in place but before the linens and centerpieces come out. This gives you a clean slate to work with, and you won't be tripping over décor. If you can get in the morning of the wedding, or even the day before, you’ve hit the setup jackpot.
Ready to bring that dream wedding atmosphere to life? 1021 Events has you covered with professional uplighting rentals and full-scale event production. Let's make it happen. You can find out more and get a quote over at our website: https://www.1021events.com.

