

Let's be honest, a generic, out-of-the-box backdrop is a huge missed opportunity. A custom photo booth backdrop, on the other hand, turns a simple photo op into a genuine experience. It's the secret ingredient that makes your event's theme pop and gets people sharing their pictures online.
This isn't just about a pretty background; it's the difference between a forgettable snapshot and a powerful memory that keeps guests buzzing for weeks.
Why Your Event Needs a Custom Backdrop
A well-thought-out backdrop does so much more than just fill an empty corner. It becomes the centerpiece of guest engagement.
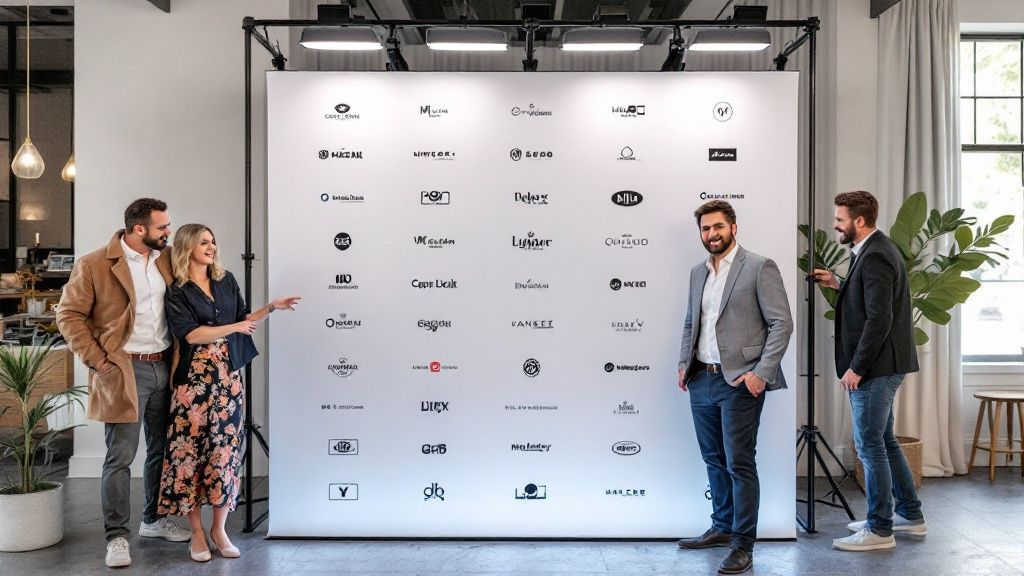
For corporate events, it’s an incredible branding tool. You can weave your logos and company colors right into the design, so every photo shared online reinforces your brand. For weddings and private parties, it’s all about locking in the theme and making every picture feel perfectly cohesive and special.
The truth is, a photo booth isn't just a fun "extra" anymore—guests expect it. The global photo booth market was valued at USD 586.65 million and is still climbing. A huge chunk of that—about 60% of all bookings—comes from weddings and corporate events. What's driving that growth? It's all about those personal touches, like the custom backdrops that make the experience feel truly unique.
Get People Posing and Posting
A killer backdrop is an open invitation. It pulls even the most camera-shy guests into the fun, encouraging them to jump in and strike a pose. This little nudge transforms people from passive attendees into active participants, and the perks don't stop when the party's over.
- Social Media Gold: Every single photo taken is a piece of user-generated content (UGC) that broadcasts your event or brand all over social media.
- Ties the Theme Together: It’s the visual anchor for your entire aesthetic. Think of a lush floral wall for a rustic wedding or a sleek, modern step-and-repeat for a product launch.
- Better-Looking Photos: A great backdrop gets rid of cluttered, distracting backgrounds, making sure every shot looks sharp, clean, and professional.
A fantastic backdrop is a magnet for online buzz. When guests share their photos, they're not just posting a memory—they're becoming brand ambassadors, amplifying your event's reach and success. It's a smart move to learn how to create UGC content that converts to really make the most of it.
At the end of the day, putting a little extra thought into your photo booth backdrop is about creating an immersive atmosphere that people will remember and talk about long after they've gone home.
Planning Your Perfect Backdrop Design
Before you start playing with fonts and color palettes, a little bit of groundwork will save you from a world of hurt later. Think of this initial stage as creating your design blueprint. Getting these details right from the jump prevents those last-minute scrambles and costly mistakes on event day.
First thing’s first: what’s the vibe? Is this a dreamy, rustic wedding full of soft pastels? A sleek corporate launch that’s all about sharp, on-brand messaging? Or maybe it’s a wild birthday bash that calls for a blast of neon energy. Whatever it is, your backdrop should feel like it belongs there, a natural extension of the whole atmosphere.
Nailing the Practical Details
Once you’ve got the mood locked in, it's time to get practical. These details are the non-negotiables that ensure a smooth setup and a backdrop that looks killer, not crooked.
- Measure Everything: Don't just eyeball it. Grab a tape measure and get the exact width and height of the space you’re working with. And please, don't forget the ceiling height—it’s a classic mistake that can derail a tall backdrop stand in a hurry.
- Talk to the Venue: Some places have surprisingly strict rules about what you can hang, set up, or even stick to a wall. Have a quick chat with the venue coordinator to check for any restrictions before you even think about placing an order.
- Budget for the Whole Package: A realistic budget isn't just for the printed vinyl. You need to account for everything: the design work (if you’re hiring it out), the printing itself, and all the hardware—the stand, the clamps, the whole rig.
This planning phase is also the perfect time to start pulling together visual ideas and inspiration. If you're looking to dive deeper, we've got a whole guide on https://1021events.com/how-to-create-photo-booth/.
A backdrop isn't just a pretty picture; it's a strategic part of your guest experience. Figure out the one key message or brand element you want to shine through, and you’ll ensure every single photo works toward your event’s goal.
The hunger for unique, personalized event experiences is blowing up. In Europe alone, the photo booth market is expected to grow at a CAGR of 8.3% through 2030. A huge driver for that growth? People want those custom touches at weddings and corporate events.
A custom backdrop is right at the heart of this trend, making the photos—and the event itself—that much more memorable. It really shows how much guests appreciate when you go the extra mile.
Choosing the Right Backdrop Material
The material you choose for your custom photo booth backdrop can make or break the final photos. Seriously, it has a huge impact on the look, durability, and even the overall cost. Getting this right is about more than just aesthetics; it’s about making sure your investment works for your specific event, whether that’s a one-and-done birthday bash or a branded backdrop you plan to use over and over.
For something that can really take a beating and still look great, vinyl is the old standby for a reason. It's tough, the colors pop, and you can just wipe it clean. This makes it a fantastic workhorse for both indoor and outdoor events. The only real catch? Its glossy finish can sometimes throw a nasty glare with flash photography, so you have to be mindful of your lighting setup.
If you're going for a more sophisticated, high-end vibe, you can't go wrong with fabric. It gives you a soft, completely glare-free finish that looks absolutely beautiful in photos. It’s that professional, polished look we all love. Fabric is also much lighter and easier to schlep around, but it wrinkles easily and is definitely an indoor-only option unless you're 100% sure the weather will cooperate.
A Closer Look at Your Options
Let's break down the most common materials to help you decide what fits your event's style and your budget.
Backdrop Material Comparison
| Material | Best For | Pros | Cons |
|---|---|---|---|
| Vinyl | Outdoor events, high-traffic areas, repeat use | Durable, easy to clean, vibrant colors | Can cause glare with flash, heavy |
| Fabric | Indoor events, elegant themes, professional portraits | Glare-free, lightweight, sophisticated look | Prone to wrinkles, less durable |
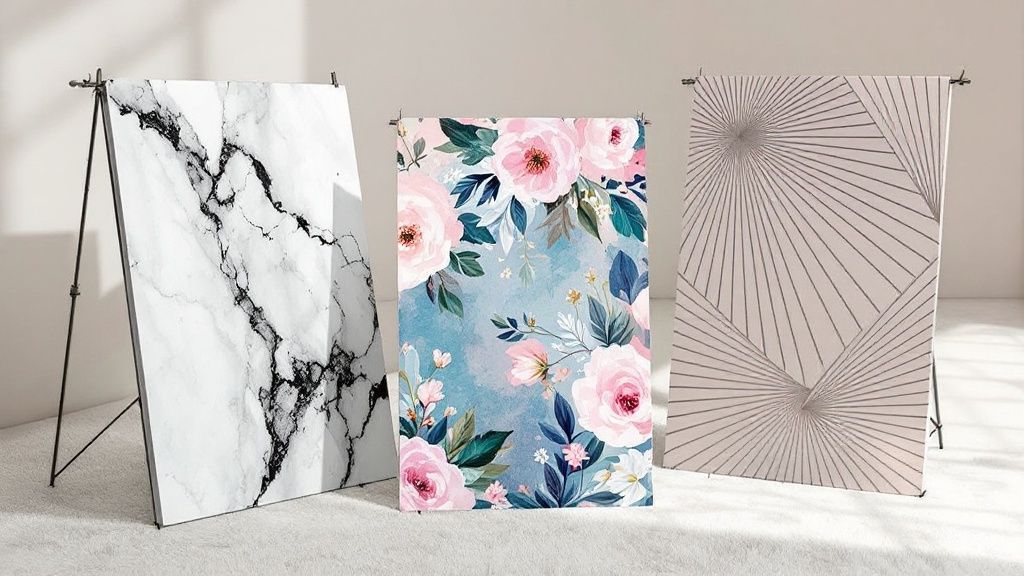
| Sequin | Glamorous parties, weddings, New Year's Eve | Eye-catching, interactive, adds sparkle | More expensive, can be delicate |
| Paper | Single-use events, DIY projects, budget-conscious | Very affordable, wide color selection | Easily torn, not reusable |
Ultimately, the best material is the one that balances your creative vision with practical considerations like your venue and budget.
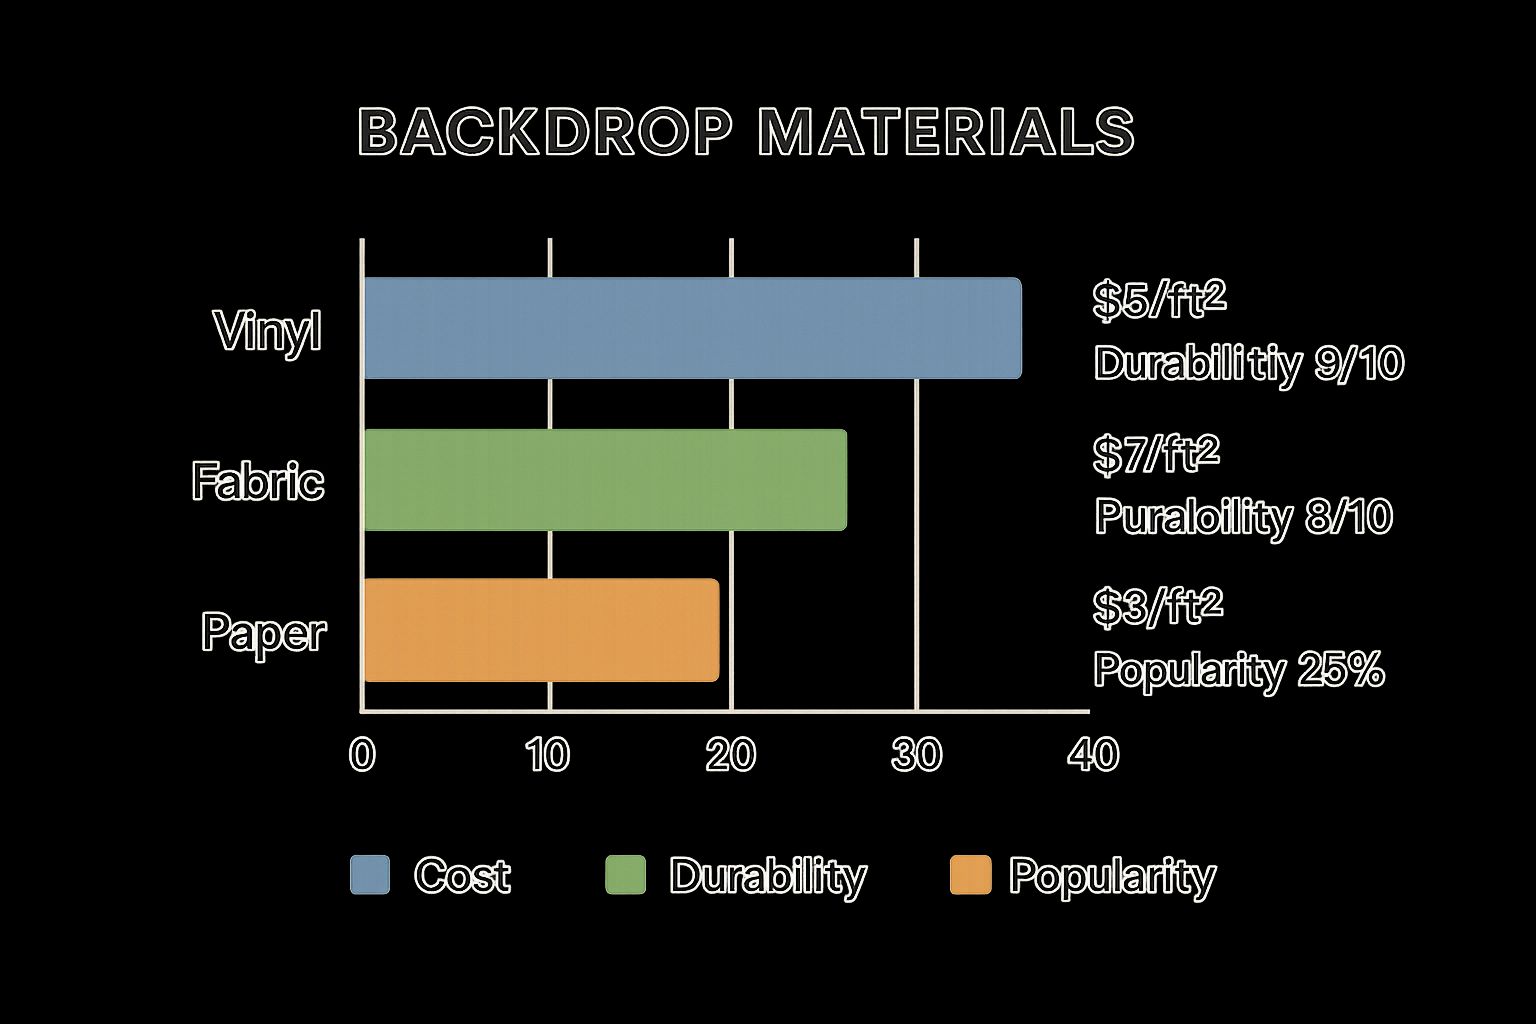
As you can see, vinyl often hits that sweet spot of affordability and toughness, while fabric brings that premium feel for a bit more investment.
Pro Tip: Don't forget about logistics! A heavy vinyl backdrop will need a much sturdier stand and maybe an extra set of hands to set up, while a lightweight fabric one is a breeze to manage but won't hold up to a gust of wind.
Of course, the backdrop is just one piece of the puzzle. To get a full picture of the costs involved, it helps to see how everything fits together. Our guide on photo booth rental prices breaks down how the booth, props, and other elements contribute to your final quote, so you can budget like a pro.
Designing a Backdrop That Gets Noticed
This is the fun part—where your vision starts becoming a reality. But a great design is more than just a pretty picture. It needs to look fantastic in photos, make your guests shine, and perfectly capture the vibe of your event.
If there’s one non-negotiable rule I’ve learned over the years, it’s this: always use high-resolution graphics. Nothing screams "amateur" faster than a blurry, pixelated backdrop. It's the first thing people notice, and it can bring down the quality of every single photo.
Color is another huge piece of the puzzle. You have to think about how your palette will play with camera flashes and what your guests might be wearing. Bright, bold colors are great for a party atmosphere, but sometimes a softer, more muted or even a monochrome backdrop lets your guests be the star of the show. The key is finding a contrast that makes people pop without completely stealing the spotlight.
From DIY Design to Professional Polish
Okay, so how do you actually create the design file? This is a big decision point, and you basically have two paths: tackle it yourself or call in a pro.
-
The DIY Route with Canva: For straightforward designs, a tool like Canva can be your best friend. It’s packed with templates and is surprisingly easy to use, even if you don't have a design background. If you have a clear vision and a decent eye for what looks good, this is a great way to save some money. We've got more hands-on tips right here: https://1021events.com/how-to-make-a-backdrop-for-photos/
-
Bringing in a Professional: If you're planning a major corporate event, a wedding, or have a really complex theme, hiring help is a smart move. Investing in professional graphic design services pays for itself. A good designer will take your concept and turn it into a flawless, print-ready file, making sure every logo and every letter is perfectly placed.
A quick tip from experience: Don't get so carried away with beautiful fonts that you forget about readability. That elegant script might look amazing up close, but if no one can read it from a few feet away in a photo, it's not doing its job.
The demand for custom backdrops always spikes during the holidays and prime wedding season, which just goes to show how essential they've become for creating those picture-perfect moments. A thoughtful design isn't just a background; it's a core part of the guest experience.
From Digital File to Event-Ready Reality
https://www.youtube.com/embed/J6fUzZ-qpwM
Alright, you’ve nailed the design. Now for the exciting part: turning that pixel-perfect file into a real, tangible backdrop that will anchor your photo booth. This is where the digital dream meets physical reality, and a few technical details make all the difference.
Your first move is to find a printing partner you can trust. Don’t just price-shop for a large-format printer; this isn't the place to cut corners. Ask for material samples to feel the quality for yourself. Is it durable? Does it have a glare? Get a clear picture of their turnaround times and shipping costs, and most importantly, get your hands on their specific file prep guide.
Prepping Your File for a Flawless Print
Sending a file that isn't print-ready is one of the most common hiccups I see, and it can cause frustrating delays and extra costs. Before you upload anything, give your file a quick pre-flight check.
- File Format: Stick with a high-quality PDF. It's the industry standard for a reason—it keeps your vectors crisp and your fonts locked in. A high-res JPEG can work in a pinch, but a PDF is always your safest bet.
- Color Mode: Your computer screen uses RGB light to show color, but printers use CMYK ink. Make sure you convert your design to CMYK in your software. It’s a small step that prevents major color surprises when you unbox the final product.
- Bleed, Bleed, Bleed: Always add a "bleed," which is just a little extra design around the edges. Think of it as an insurance policy. If the printer's cutting machine is off by a millimeter, the bleed ensures you won't have any ugly white slivers along the border.
Submitting a print-ready file saves you time, money, and a whole lot of stress. Honestly, just double-checking these three things—format, color, and bleed—is the best way to guarantee the backdrop you designed is the backdrop you get.
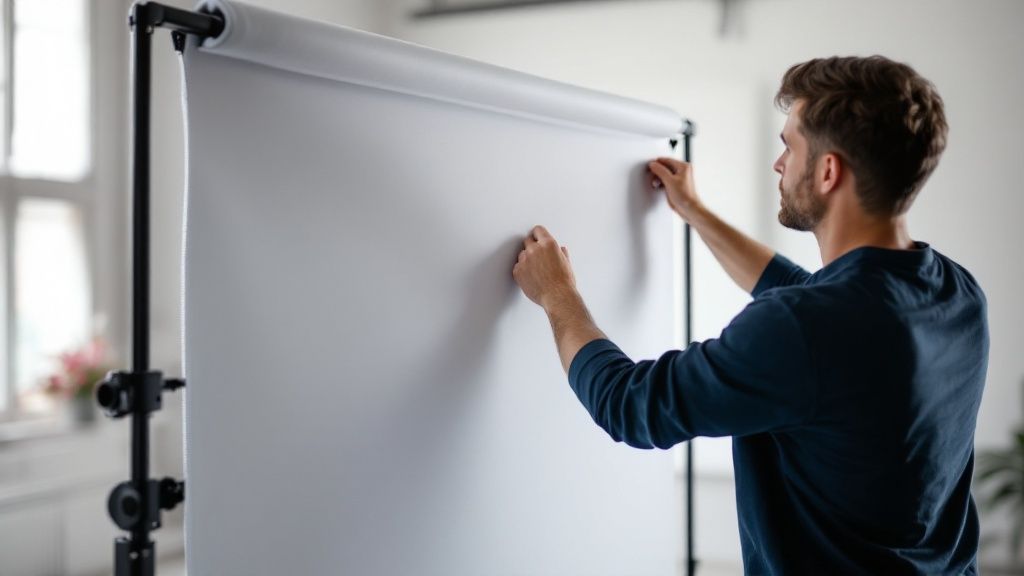
Once the delivery truck pulls away and your backdrop has arrived, it's time for the final assembly. Most portable stands are pretty intuitive, usually with telescoping poles. Just lay everything out on the floor, connect the feet to the base, and then extend the poles to match your backdrop’s size.
From there, carefully slide the backdrop onto the crossbar. Pull it taut to smooth out any wrinkles from shipping, and use a few clamps to keep it secure. You’re looking for that clean, seamless, professional finish. And just like that, you’re ready to go.
Got Questions? We’ve Got Answers.
When you're deep in event planning, a few questions about the details always pop up. Let's tackle some of the most common ones I hear about getting a custom photo booth backdrop just right.
How Far Out Should I Order My Backdrop?
Timing is absolutely crucial here. I always tell my clients to give themselves a buffer of at least 3-4 weeks before the event date.
Think of it this way: you'll need about a week for the back-and-forth on the design, another week or two for the actual printing, and then a final week for shipping. Trying to cram that into a shorter window is just asking for stress and potential rush fees.
What's the #1 Design Mistake People Make?
Hands down, the biggest blunder is using low-resolution images. It happens all the time—someone sends over a logo they pulled from their website, and it looks fine on a screen.
But when that tiny file gets stretched to 8×8 feet, it turns into a blurry, pixelated disaster. Always, always provide your designer with high-resolution vector files or images that are at least 300 DPI.
A fuzzy backdrop doesn't just look bad; it reflects poorly on your brand or event. It’s the one detail that can make an otherwise polished setup feel cheap. Getting the file right from the get-go is non-negotiable.
Can I Use My Custom Backdrop More Than Once?
You bet! That’s one of the best parts of investing in a quality backdrop. If you go with a durable fabric or vinyl material, it’s built to last.
The trick is to store it properly. Always roll it up neatly—never fold it! Folding creates nasty creases that are almost impossible to get out. Keep it in a dry, safe spot, and it'll be ready for your next event. For some great inspiration on what to create, take a look at our guide on building a DIY photo booth backdrop.
Ready to design a backdrop that will have guests lining up? 1021 Events is all about creating those picture-perfect moments with stunning, high-quality custom backdrops. Let's make something amazing together at https://www.1021events.com.

